Monday, July 25, 2016

Summer EdTech Challenge: #8: It's a small world!

Welcome to the Summer EdTech Challenge! Summertime is a wonderful time to be a teacher! It's the perfect time to recharge your batteries, catch up on trends in education, read for pleasure, and learn new things. How about taking the opportunity to learn new tech skills or try out new tools and strategies?

Each Monday this summer I'll post a simple tech challenge, something you can do between dips in the pool and binge watching your favorite TV show. These challenges are practical, easy to implement ideas to help you develop your tech skills and start next year off on the right technology foot!

The world is becoming a very small place. With today's technologies we can watch events unfold as they happen, communicate with experts in other countries and continents, and visit places we wouldn't be able to otherwise. It's actually a pretty small world out there and teachers have the opportunity to give students unique global experiences.

Through these global experiences students can learn that:
  • they are part of something bigger
  • the world needs to be taken care of
  • the world is (figuratively) flat
Here are a variety of ways you can bring the world into your classroom.

Mystery Skype - this is a fun country- or globe-trotting game where students connect with a class in another location with each trying to guess the location of the other using yes or no geographic type questions. I've played this game with classes in second grade up to high school. We've connected with classes in nearby states as well as New Zealand, Canada, and Venezuela. Younger grades can do a Mystery Number type activity, while older grades could do a Mystery Book or Mystery Element for science classes.

Skype - while Mystery Skype is one of my all time favorite activities, Skype can be used for much more than that. Microsoft's Skype in the Classroom site has many activities classes can do via Skype. Bring in an author to discuss their books or the writing process, connect with a zoo to learn more about animals, follow an expedition to the north pole, or bring a content expert into your classroom.

Global Read Aloud - read a book out load to your students during a set 6 week period. During that time make connections with other classrooms around the globe that are reading the same book. The depth of the project and the tools used (Skype, Edmodo, Twitter, etc) are up to the teachers. There are books to choose for all grade levels, including kindergarten.


Adventure 2016 - participate in the world's largest cultural exchange on November 17. Classrooms around the world will connect online that day to share what its like to be child in their part of the world.

The Global Classroom Project - is a rich resource for finding new ways to connect, share, learn and collaborate globally. You can find all kinds of projects to collaborate on with classrooms in over 35 countries. You come up with the project and use this site to advertise and connect with others.

Kid World Citizen - this website is a treasure trove of resources to help your students become global citizens. There are games, recipes, music, art projects, and even service projects that can be done locally or globally. You can search by country or topic such art, food, language, or celebration.

Digital Explorer - this site is about more than just making global connections. This site provides rich, curriculum-based resources to help connect students with explorers and scientists to learn about and solve global problems. This site provides real world ways for your students to get involved with global problems and solutions.

Since I am returning to the classroom this year as a 4th grade teacher I am committed to doing Mystery Skypes with my class. My goal is to Skype with a class from all 50 states. I've also signed up to do participate in Adventure 16. I'm going to explore some of the resources on the Digital Explorer site to find one my students can get involved with.

The challenge for this week is to explore the global education resources above and sign up for one for the upcoming school year. These are just a sample of projects and sights available. Feel free to do a web search for other resources and find one that appeals to you. The challenge is to become a global educator and help your students become global citizens. Let me know in the comments what you discover and commit to!

Read More »

Monday, July 18, 2016

Summer EdTech Challenge #7: Interactive videos

Welcome to the Summer EdTech Challenge! Summertime is a wonderful time to be a teacher! It's the perfect time to recharge your batteries, catch up on trends in education, read for pleasure, and learn new things. How about taking the opportunity to learn new tech skills or try out new tools and strategies?

Each Monday this summer I'll post a simple tech challenge, something you can do between dips in the pool and binge watching your favorite TV show. These challenges are practical, easy to implement ideas to help you develop your tech skills and start next year off on the right technology foot!

Our students live in a video filled world. YouTube is the 2nd largest search engine, with 3 billion searches per month and 6 billion hours of video viewed every month. They say a picture is worth a thousand words (see what I did there?), so what is a video worth in your classroom? Videos engage students in the content, set the stage for a lesson, reach more visual modalities, take students places they may never get to, and help them visualize complex concepts.

The biggest problem with using video, especially when assigned as individual assignments, is holding students accountable for what they view. While video is easy to link to or embed, its much harder to make sure students watch a clip in its entirety, don't get distracted by "related videos", or get lost on the world wide web, let alone understand the concepts we wanted them to master from the video.

This post originally started out with the idea of encouraging teachers to look at three really good options for embedding questions into videos as a means of holding students accountable. Unfortunately a post came across my Twitter feed announcing that Zaption was shutting down in September.
As far as I can tell this leaves only two options: EDpuzzle and PlayPosit (formerly known as EduCanon). I tried looking at a third option, Vizia, which is a super simple version of the same idea. But I just couldn't get it to work. The videos took forever to load and when I went to preview it after embedding questions the video never loaded. I'm hoping the developers continue to work on it because it was super simple to use and I love having options.

So now we are down to two options, unless someone leaves me a comment with other ideas. Both of these platforms allow you to import video from a variety of sources (YouTube, Vimeo, Khan Academy, LearnZillion, TedTalks, etc), clip the section you want, and embed multiple choice and free response questions. These interactive videos are then assigned to students. Both offer Google Classroom integration, making it easy to create classes and student accounts. Students then view the video and are stopped at teacher determined points to answer questions. Students cannot advance through the video until the questions are answered. Pretty slick way to hold students accountable!

Your challenge this week is to create an interactive video for your class to use next year. If you need some ideas of how you can use video, check out my blog post 7 Ways to Use YouTube in the Classroom. Then read my reviews on these two platforms (linked in the images below). Each has their own strengths and weaknesses, as well as a different interface. You'll need to try them out to see which one you prefer.


After deciding on a platform, create an interactive video to use in your class. Let me know in the comments how you plan to use the video. Was it difficult to embed the questions? What do you see is the value of a tool like this?

Here is an example of an interactive video I created for a 5th grade class using EDpuzzle.

Read More »

Monday, July 11, 2016

Summer EdTech Challenge #6: Formative Assessment tools

Welcome to the Summer EdTech Challenge! Summertime is a wonderful time to be a teacher! It's the perfect time to recharge your batteries, catch up on trends in education, read for pleasure, and learn new things. How about taking the opportunity to learn new tech skills or try out new tools and strategies?

Each Monday this summer I'll post a simple tech challenge, something you can do between dips in the pool and binge watching your favorite TV show. These challenges are practical, easy to implement ideas to help you develop your tech skills and start next year off on the right technology foot!

Formative assessment is a process used by teachers and students during instruction that provides feedback to adjust ongoing teaching and learning to improve students' achievement of intended instructional outcomes. It is a tool most teachers use to determine where the learning needs to go, whether students are understanding content or if more time needs to spent on certain skills before moving on. Check out this short video on formative assessment by Dylan William, a leading educational expert on formative assessment.


Luckily for teachers, there are many digital formative assessment tools out there. Digital tools offer many advantages over traditional paper and pencil type assessments. The biggest advantage is the ability to collect and analyze data instantaneously. As soon as students have answered a question or completed an assessment, it's graded and teachers have the data necessary to gauge the next direction in learning. No longer do teachers need to wait until after school to grade them and analyze the data. The data is permanent and can be reviewed at any time. In most cases it can be downloaded as a spreadsheet where teachers can further manipulate and analyze the data.

In addition to the quick access to data and results, digital tools offer these benefits:
  • make student thinking visible
  • provide efficient and immediate feedback
  • increase human interaction and debate
  • increase classroom participation and attentiveness
  • encouraging risk-taking with anonymous student responses
There are a variety of digital tools out there that can assess in a variety of ways, depending on the type of data the teacher is trying to collect. I believe that teachers should be familiar with a variety of digital tools, so they can be used in a variety of situations. Here is a list of some tools that are great for collecting real-time polling/survey data and student feedback regarding the concepts/ideas required to reach learning objectives.

Poll Everywhere is great for BYOD classrooms. Students can use their own cell phone, regardless of whether it is a smartphone or not. One feature I love about Poll Everywhere is the ability to collect words or phrases and display them as a word cloud.

Socrative is a good old standby for formative assessment tools. Teachers can ask multiple choice and true/false type questions that can include images. It has an iPad app for both teachers and students, but can also be accessed via the web. Many teachers have created Socrative quizzes and share them freely on the web.

Quizzez
Kahoot and Quizizz are game-based response systems. Students compete individually or in teams and earn points based on how quickly they can answer the questions. The game-based aspect of these systems is highly motivating and engaging for students. They are web-based so students can use any web enabled device such as a tablet, phone, or computer.

GoFormative lets you to upload an assignment in the form of some text, images, videos or a document.  Choose how you want to assess it, typed response, multiple choice or show your work. Assign it to you learners and watch live as they go through it. Students can type, show their work with drawings or submit images and you can see how all the learners are doing live.

Student responders such as CPS and Activotes are common in many classrooms and schools. Teachers can easily use them for polls and quizzes during lessons. They are easily set up, reliable, and don't require any additional tools beyond the software installed on the teacher's workstation.


Plickers are a good solution for classes that don't have access to classroom responders. Teachers print out QR Code style forms and use their cell phone to "poll" the classroom. This is a nice solution because students don't need a device in order to participate.

Your challenge this week is to become familiar with one of these digital formative assessment tools or select one of your own that you've heard of. Take one of the quizzes that you would normally use in class and recreate it using the tool you selected. Have it all ready to use in class this upcoming school year.

In the comments below let me know which tool you selected and why. Don't forget to tell me about the quiz you made - what you are trying to assess and how it fits into your curriculum.

Read More »

Monday, July 4, 2016

Summer EdTech Challenge #5: Keyboard shortcuts

Welcome to the Summer EdTech Challenge! Summertime is a wonderful time to be a teacher! It's the perfect time to recharge your batteries, catch up on trends in education, read for pleasure, and learn new things. How about taking the opportunity to learn new tech skills or try out new tools and strategies?

Each Monday this summer I'll post a simple tech challenge, something you can do between dips in the pool and binge watching your favorite TV show. These challenges are practical, easy to implement ideas to help you develop your tech skills and start next year off on the right technology foot!

 Getting your edtech skills on isn't always about discovering new things. Sometimes its just about getting better or more efficient at what you already do. That's what this challenge is all about. We spend a lot of time in front of computers. Wouldn't it be helpful if we could use them more efficiently?

Shortcut keys help provide an easier and usually quicker method of navigating and executing commands in different programs. Shortcut keys are usually accessed by the Ctrl key in Windows and the Command key on Macs. Sometimes an additional key is used such as Shift or Alt.

If you know of a command you commonly use in a program, but are unsure of the shortcut, look at the menus. Usually the shortcuts will be shown next to the command. For example, notice the shortcut keys for Save in the screenshots below.


General Shortcuts

Here is a list of shortcuts commonly used for moving around your computer and dealing with files or programs.
WindowsMacAction
Ctrl+X⌘ Command+XCut: Remove the selected item and copy it to the Clipboard.
Ctrl+C⌘ Command+CCopy the selected item to the Clipboard.
Ctrl+V⌘ Command+VPaste the contents of the Clipboard into the current document or app.
Ctrl+Z⌘ Command+ZUndo the previous command.
Ctrl+YShift+⌘ Command+ZRedo the previous command.
Ctrl+A⌘ Command+ASelect All items.
Ctrl+N⌘ Command+NNew: Open an new document or window.
Ctrl+Shift+NShift+⌘ Command+NNew folder.
Ctrl+O⌘ Command+OOpen the selected item, or open a dialog to select a file to open.
Ctrl+W⌘ Command+WClose the front window or current tab.
Alt+Tab⌘ Command+TabSwitch between open apps.
Ctrl+T⌘ Command+TOpen a new tab and jump to it
Ctrl+L⌘ Command+LJump to the Address Bar in a web browser.

Document Shortcuts

The shortcuts listed here are used within most applications, whether it's Microsoft Word, Google Docs, iMovie, or any other type of program.
WindowsMacAction
Ctrl+B⌘ Command-BBoldface the selected text, or turn boldfacing on or off.
Ctrl+I⌘ Command-IItalicize the selected text, or turn italics on or off.
Ctrl+U⌘ Command-UUnderline the selected text, or turn underlining on or off.
Ctrl+P⌘ Command+PPrint the current document.
Ctrl+S⌘ Command+SSave the current document.
Ctrl+F⌘ Command+FFind.

There are many other keyboard shortcuts beyond these. There are shortcuts for logging out users on a computer, shutting down or restarting the computer, moving the cursor to different points in a document, cycling through open tabs in a web browser, and many, many more. You can check out more of them at these sites:

Wikipedia (includes a very comprehensive list, grouped logically)
Mac keyboard shortcuts
Shortcutworld (includes shortcuts for Google Docs)

iPad Shortcuts

Why should computers get all the shortcut love? iPads (and iPhones) also have shortcuts that help you accomplish tasks faster. In the touch tablet world these are called gestures. Here is a short list of commonly used iPad gestures.

# of fingersGestureAction
oneslide up or downScroll through page content.
oneflick up or downQuickly scroll through page content. Tap to stop.
onetapSelect
twopinch togetherZoom out.
twospread apart (unpinch)Zoom in.
four or fivepinch togetherClose app and go to the home screen.
four or fiveswipe left or rightSwitch between open apps.
fiveswipe upShow multitasking view to switch between apps.

For this week's challenge, find some shortcuts you haven't used before. As you use your computer this week, try them out. It might take a few tries to remember the key strokes, but the more you use them, the more ingrained in your memory they will be. I was not aware of the Command+L shortcut to quickly get to the address bar. I'll be practicing that one a lot this week, since I'll be doing a lot of work on the web!

After trying them for awhile, come back and share in the comments what your experience was like. What shortcuts did you find most valuable? Were you able to find others that weren't on this list?

Read More »

Sunday, July 3, 2016

Share EDpuzzle videos with anyone

EDpuzzle has a nifty feature where teachers can share links to or embed EDpuzzle videos with others who are not in their classroom. Users can watch the video and answer any of the questions, but progress won't be saved back to your EDpuzzle account. This lets the users check their understanding of the video content, and you don't have to worry about muddying up your reports.

To get the share or embed link, click on the My Content tab, locate the video, and click the share icon in the upper left corner. Click the Share with anyone button and copy the link or embed code.


Here's an example of an embedded EDpuzzle video. I used it to introduce a class of 5th grade students to the formula for finding the area of a rectangle. Notice that some of the questions use another feature I love about EDpuzzle: the ability to insert images right into the question.
Read More »

Cool and useful website: PlayPosit

More and more teachers using video in their classroom for good reason. Videos are engaging, are visual, and can really help to explain concepts or illustrate a point. Flipped classrooms are becoming more and more popular and generally utilize videos to teach concepts prior to students coming to class. The problem most teachers find with videos is holding the students accountable for what they see.

Enter in PlayPosit. PlayPosit (formerly known as EduCanon) is an online learning environment where teachers create interactive videos with embedded questions and comments. These interactive videos are referred to as "bulbs". When you grab a video from a source such as YouTube, you can stop the video at any point and insert a question. When students watch the video and get to that point, they must answer the question before they can continue on. The correct answers are graded and the teacher can view the data to determine who watched the video and how well the understood the questions - holding the students accountable for the video viewing.

PlayPosit is free with a few limitations. The premium version lets teachers choose more question types, download worksheets of the questions in the bulb, and advanced cropping. I don't believe that these limitations inhibit the power of the site, though.

To get started go to https://www.playposit.com/join and sign up with a new account or use your Google login, which also gives you Google Classroom integration.

Tap the Design tab and enter the video URL or search through videos for the topic you want. There are also many educational YouTube channels that you can browse through to find the perfect video. You can preview any video or click Use to select it. You can also see other pre-made bulbs for this video.

Click Crop Video and you can drag from the beginning or end to select only a clip.

Play the video and position the cursor where you want to insert a question. Click Add Question and select a question type. The only question types available with the free version are Multiple choice, Free response, and Reflective Pause. Fill in the questions and possible answers. There are basic text formatting tools as well as the ability to upload images and record audio in both the question and answers. Unfortunately it appears that you can only insert one question at any given point.


Before you can assign bulbs to your students you need to create classes and enroll students. Students will create their own PlayPosit account and then join your class using the class code. If you use Google Classroom you can import your classes and rosters. Go back to your Dash and click on Fill Out Profile. Scroll to Google Classroom Sync and click the icon. A screen will appear where you can select which class (or multiple classes) you want to import. Scroll to the bottom and click Save Google Class Room. After refreshing the screen you'll see your students listed.

Click on the Bulbs tab to see all the bulbs you have created. Click Assign on the bulb you want to use and Assign next to the class. Pick a due date for the assignment.

Students can view the videos on the website or through the free iPad app. The app is only for students to view the videos. Teachers cannot use the app to create the bulbs.

After students have completed the bulbs, click the Monitor tab, select the class, and then the assignment to see data for the assignment.

PlayPosit has some great features and is super easy to set up and use. It's comparable to other interactive video platforms such as EdPuzzle. I would love to hear your thoughts and ideas of how you can use a platform like PlayPosit. Let me know in the comments below.


Read More »

Awesome iPad App: Touchcast Studio

Using video in the classroom helps those visual learners master content and keeps them engaged. Unfortunately video tends to be a passive activity where students simply sit and watch. No more! Now with TouchCast teachers (and students) can make interactive videos where students can tap the screen to interact with the video, take a poll, view a website within the video, scroll through a document, and more. Think of it as ThingLink for videos.

TouchCast is a free iPad app that teachers and students and students in most grade levels can use. Here is a TouchCast made by Lindsay Baker (@linzbaker), an educator from California. In this video she models many of the interactive video features available. 


If the interactive part doesn't work, try viewing the video from the TouchCast website at https://www.touchcast.com/baker1123/heres_how_to_use_a_touchcast_in_your_classroom

TouchCast produces a channel called EduCasts that features the best educational TouchCasts being made. These videos will give you ideas of how other teachers and classrooms are using TouchCast. You can view them at http://www.touchcast.com/educasts/ along with lesson plans at http://www.touchcast.com/lessonPlan/

Getting started with TouchCast is easy. Sign up is free for both teachers and students, but does require an email address. Creating a touchcast is done in 5 steps:

1. Scripting and planning

Have students write out a script, planning what they want to say and allowing time (pauses) in the script for vApps to appear on screen and stay there for a few seconds.

2. Filming

Launch TouchCast, make sure you are on the Cast Side, and tap the Start from Scratch theme.

The Effects tab at the bottom of the screen lets you add filters, add guides to help line things up, and add Green Screen.

You can also add Whiteboards where you can annotate on the screen.


3. Editing video clips

All of the clips from filming are in the Projects tab. You can re-order the clips, trim them down, duplicate and add transitions. Put all the clips together in the order you want them to appear in the video. Once individual clips are merged into one large video, import the video back into TouchCast using the Start from Scratch theme again.

4. Preparing interactive content

To add interactive content (vApps), tap the vApps button. Tap any of the apps to customize it and then tap Use. All selected vApps will appear in the vApp tray at the bottom of the screen, ready to use during the touchcast simply by tapping it. They can be positioned anywhere on the screen by dragging it, resized, and changing the options by tapping the gear icon. When everything is done be sure to save the project.

5. Recording the touchcast.

Press the red Record button and start recording, adding the vApps as you go. Tap the Done button when you are finished and you can preview the touchcast. You can always go back and edit the video or the vApps.

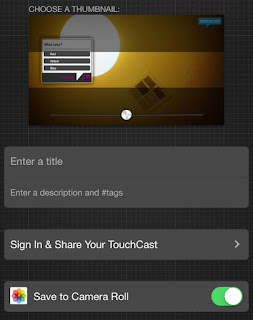
6. Exporting

When everything is like you want, tap Export TouchCast, name the touchcast and press Save. When you are signed in to your account it will save to your TouchCast channel as well as giving you the option to save to the Camera Roll.

There is a lot of power in this little app that allows you and your students to create some high quality videos. It seems to have a little learning curve and certainly requires some pre-planning (scripting), but I think students will enjoy working with it.

In my classroom this year, I plan on having a mini video studio set up in one corner of the room with green screen capabilities. Students will be able to use the iPads to create reports, screencasts, and other projects. I think TouchCast will be a great addition to this area.

Have you used TouchCast with your students? Let me know in the comments what you have done with it.

Read More »

Saturday, July 2, 2016

Reading log alternatives: a comparison

I never really thought about reading logs until last year when I read a few posts by one of the bloggers I follow, Pernille Ripp (@pernilleripp). She has written a few posts on the subject, pointing out how reading logs actually discourage students from reading. Curious about this whole idea, I searched the topic and found that many other educators feel the same way. They assign reading logs only because they have to or its the way its always been done, not because they actually help students. In fact, a new post just this past month, In the Classroom: The Problem with Reading Logs and What I Did About It, caught my eye and brought this topic to the forefront of my thoughts again.

After reading her thoughts on it and examining my own habits as a parent, I realized that reading logs probably aren't the best way to hold students accountable. I read with my children every night, but I'm really bad about making sure it gets recorded in their log. In fact, I don't pay attention to the time required on the log at all. Last year my first grader was supposed to read 15 minutes a night. Instead, I just had her read a picture book or a beginner's chapter book until she was done, regardless of whether it took 5 minutes or 20. And then I just initialed for the time.

What I think students like better and is more motivating, is simply letting them choose the books they want to read and keeping track in a list. Not recording how many pages or how many minutes (because they always want to know the maximum number they have to read). There are several digital tools that help with this. I've blogged about Biblionasium, Bookopolis, and Goodreads, all websites where students can interact within the community, recording the books they read, sharing recommendations, writing reviews, and reading reviews from their peers.

Deciding which tool to use within your own class can be a tough decision. There are things to like about each one of these platforms, and limitations that make me think twice. I use Goodreads for myself and love it, but I can't use it with my class because of the age restriction. Here's a chart comparing features from all three platforms.

Please let me know in the comments if there is another criteria that I should be using to compare them. Also share any feedback you have on using any of them in the classroom, or suggest one that I haven't discovered yet.

Read More »

Cool and useful website: Bookopolis

Educators know that the more students read the better readers they become. In most classrooms students are asked to read every night. There are many different ways students can record their daily reading. Bookopolis is a website teachers can use to have students record books they are reading and discover new ones. They can see what their classmates are reading, read book reviews by other students, and share what books they are interested in reading.


Setup

Registration is completely free. All users go to the http://www.bookopolis.com website to create their account. Teachers can create an account using their email address or sign in using Google. If they use Google Classroom, Bookopolis will import their Classrooms and student rosters automatically. Student accounts can also be created manually with the teacher creating the username and passwords.

After classes and student accounts have been created, the teacher goes to My Dashboard to manage accounts and see what students are doing. The teacher can click on a student name to see their "world". The world view shows the student's books, badges, and recommend books.

Shelves

To manage books, users click on My World. Students can search for books and add them to one of three shelves: Reading it Now, I Read It, and I Want to Read It. When choose books students can see ratings from other students as well as read reviews. These ratings and reviews are not limited to just students within their class.

Rate and Review

Once a book has been read students can share their rating, leave a review, and recommend it to their friends. Each of the following four screens is available to students. 

It's this socialization and sharing that makes sites like Bookopolis appealing to students and teachers alike. Students can see what their friends are reading and discover new books based on their interests and what they've read in the past. This socialization, sharing, and discovery with peers encourages students to try new books and read more.

Read More »

Awesome iPad App: Videoliscious

Videoliscious is a simple video creation app for iPads. The app is free, but has a 60 second limit. It's simple to use, has a clean interface, and is great for creating short videos on the go.

There are only 3 steps needed to create the videos. The app makes it super easy for students by walking them through each step.

Step 1

Select videos and photos you want to use. These can be from the Photos app or take live video with the camera. It includes a tool to let you trim your video so you can include just the right shot.


Step 2

Add narration to the video. After choosing microphone only, students record their voice as they narrate over videos and photos. The videos and photos chosen in Step 1 appear in the bottom right corner. As the student talks, they tap on each video or picture. These are all combined to make the full video.

Step 3

Add background music from the Videoliscious library. The free version is severely limited in the number of options, but the chosen music is ducked under the narration from Step 2.

Finished videos can only be saved to Facebook, Twitter, YouTube or emailed to the teacher. They are not saved to the camera roll.

This app is straight forward and easy to use. Students can easily master it in a matter of seconds. It's great for short (60 second) projects.  One limitation is where the video is saved. Since it's not saved to the camera roll, the only viable option is to email it to the teacher.

Check out these two blogs for some ideas of how this app could be used in the classroom.

Oral Presentations
Vocabulary

Although the 60 second time limit and inability to save to the camera roll are limitations, I think I will include this app in my video toolbox on our class iPads. I'm excited to share it with my students to see what they come up with. Let me know in the comments how you are using this app with your students!


Read More »

Friday, July 1, 2016

Writing math equations on Blogger

Yes, you math teachers have some unique writing requirements! You have unique symbols, need superscript and subscript letters and numbers, and other precise ways ways of writing out information. I am no mathematician, but I feel your frustration when it comes to writing out these equations in Blogger.

Fortunately there are many mathematicians on the internet that also blog and have found solutions to this problem.

In order to write superscript and subscript letters, you have to jump to the HTML side and add in some codes there. It's not that complicated, but in my opinion it would be much easier if there were a button to do it for you. Some other blogs (Wordpress) apparently have this functionality. If you are not afraid of a little HTML and just need the superscript and subscript letters, jump over to http://www.learnerswings.com/2014/09/how-to-write-superscript-and-subscript.html for a quick tutorial.

If you also have to do those other fancy math equations with brackets, fractions, and all sorts of other formatting, there is another way to do that as well. This is a little more complicated as it involves installing a script on your blog. There is a computer programming language out there called LaTeX that allows you to write out math equations in plain text and have it appear properly on your blog. Directions are at http://pleasemakeanote.blogspot.com/2008/09/how-to-post-math-equations-in-blogger_06.html (scroll towards the bottom).

If you know of a better/easier way to write math equations on Blogger, please let me know in the comments below. I'd also like to know how it can be done with Edublogs and KidBlog.

Read More »

Kahoot and Quizizz Comparison


Students love playing games. Unfortunately they may not enjoy studying for tests or reviewing material as much. Fortunately for teachers there are two great tools that get students excited about reviewing and studying. Kahoot! and Quizizz are both web based formative assessment tools that work on any device. Because of the competitive, game based aspect students are excited and motivated to answer the questions. There are several advantages to using these digital tools.

  • Most students are naturally competitive. The leader boards on these games encourage students to try harder so their names will appear.
  • Both tools are web based so it doesn't matter what device students have: desktop, laptop, iPad, cell phone, Chromebook - they all work.
  • Students can work in pairs or small groups to discuss and answer and submit it together.
  • As with all digital formative assessment tools, these quizzes are graded automatically and provide immediate feedback for students and teachers.
  • The reports for both platforms are phenomenal, breaking down responses by student and question.

Although both platforms are game-based and have many similarities, there are a three big differences that teachers need to be aware of.

Question/Answer Projection

Kahoot! shows the question and answer choices on the classroom projector. On their device, students only see buttons that correspond to the answer choices. They have to look back and forth between the large screen and their device. Kahoot! has a very good reason for being setup like this.

Quizizz, on the other hand, doesn't need the class projector at all. Both the questions and the answer options appear on the students' devices. This frees up the teacher's computer so they can view the game's results in real time.  Tony Vincent, on his Learning in Hand blog, has an excellent graphic illustrating this point.

Pace

With Kahoot! the teacher sets the pace. The teacher determines the response time for each question. They can also choose to pause after each question, discuss answers and deal with any misconceptions. This enables a deeper discussion of the material and why certain answers are correct. However, the teacher gets to determine the pace - all students have to answer the same question at the same time. Because Quizizz is player-based, students can work through it at their own pace, answering questions quickly or taking their time. Response time in Quizizz can be set up to 15 minutes.

I consider myself a smart person, but sometimes I just process information a little slower. Games like Kahoot! are frustrating for me because I feel rushed and cannot take the time I need to 1) process the question 2) look for the answer and 3) find the answer on my device. Because Quizizz is player-based, I can work at my own pace and take the time I need to process the information, provided the teacher has set enough response time.

Homework

Kahoot!, by design, is meant to be played whole class. Because of that, games cannot be assigned to students as homework or to work on later. Quizizz can be assigned as homework that students have up to two weeks to complete. If you are using Google Classroom, Quizizz has full integration, letting you create Classroom assignments right from within the quiz.

I love both platforms and believe teachers need to have both tools in their formative assessment toolbox. They each have their strengths. Both are extremely easy to use and provide great data for teachers.  These are both great tools when its time to review and prepare students for tests.

Read More »

Formative Assessment Toolbox: Quizizz

Formative assessments are easy to do with the many digital tools available. One great tool for your formative assessment toolbox is a new website, Quizizz. You may have read my post on Kahoot!, a game-based formative response system. Quizizz is a similar tool, but with several differences. Quizizz is web-based so it can be used on any internet connected device, whether it's a desktop computer or mobile device.
  1. Teachers create a free account at http://www.quizizz.com.
  2. Create your first quiz by clicking the Create button. You'll first be prompted to name your quiz and include a cover image. Quizzes can be created from scratch or imported from an csv formatted file. This is a great way to bring in quizzes teachers may have created with other tools.

  1. This is where you enter your questions. There are some basic text formatting options, including the ability to insert symbols such as fractions, math, Greek, Latin, and currency. You can also include an image for your question.
  2. Set the time for the question. The default is 30 seconds, but there are options from 5 seconds to 15 minutes.
  3. You can add up to 4 possible answers. Don't forget to set the correct answer!
  4. A live preview of the question appears on the right side. Students will see the answer choices on their device. Answers will be in a random order for each student.
  5. Teachers can search for and include questions from public quizzes.
  6. Click New Question to create a new blank question.
  7. Click Finish when you are done.
  8. Specify the grade level and subject area for the quiz.
Quizzes can then be played immediately or assigned as homework. If the homework option is chosen, teachers can set the day and time (up to two weeks) the quiz must be completed by. These homework quizzes can be shared directly with Google Classroom too!

Regardless of which option is used, there are several settings teachers can use to customize the game play.

To take the quiz, students go to http://login.quizizz.com and enter the game code for that quiz. It's that easy!
Try out Quizizz and let me know what you think. Was it easy for you to create and assign quizzes? What did your students think of the game play?

Read More »