Showing posts with label video. Show all posts

Monday, August 15, 2016

Summer EdTech Challenge #11: YouTube Generation

Welcome to the Summer EdTech Challenge! Summertime is a wonderful time to be a teacher! It's the perfect time to recharge your batteries, catch up on trends in education, read for pleasure, and learn new things. How about taking the opportunity to learn new tech skills or try out new tools and strategies?

Each Monday this summer I'll post a simple tech challenge, something you can do between dips in the pool and binge watching your favorite TV show. These challenges are practical, easy to implement ideas to help you develop your tech skills and start next year off on the right technology foot!

YouTube was created by a few PayPal employees back in 2005 as a way to upload and share videos. During the summer of 2006, YouTube was one of the fasted growing sites on the web with 100 million video views per day in July. With YouTube only being 11 years old, that means students in elementary school and entering middle and high school don't know what the internet (and their life) was like without it! They are often referred to as the YouTube Generation or Gen C - the group that cares about creation, curation, connection, and community.

Enter the teacher. In order to engage students and bring relevance and meaning to their learning activities, videos can often be embedded within the lesson or used as a hook to get students interested. There are many ways YouTube can be used in the classroom - and not just as filler. Check out my post 7 ways to use YouTube in the classroom for some cool ideas.

Having trouble finding that perfect video? Check out my post Search YouTube like a boss! for tips on filtering out the cruft and easily finding the right video with the right content and right length. After searching through  YouTube you'll find that you want to curate your own video collections using playlists. Also following quality YouTube channels will help you keep on top of your favorite YouTube authors.

Your EdTech Challenge this week is to read through those blog posts about integrating YouTube. Then explore YouTube, finding videos, creating playlists, and subscribing to channels to supplement your classroom. Share in the comments what you've discovered. I'm always looking for interesting videos and YouTube channels to help with my teaching!


Read More »

Monday, July 18, 2016

Summer EdTech Challenge #7: Interactive videos

Welcome to the Summer EdTech Challenge! Summertime is a wonderful time to be a teacher! It's the perfect time to recharge your batteries, catch up on trends in education, read for pleasure, and learn new things. How about taking the opportunity to learn new tech skills or try out new tools and strategies?

Each Monday this summer I'll post a simple tech challenge, something you can do between dips in the pool and binge watching your favorite TV show. These challenges are practical, easy to implement ideas to help you develop your tech skills and start next year off on the right technology foot!

Our students live in a video filled world. YouTube is the 2nd largest search engine, with 3 billion searches per month and 6 billion hours of video viewed every month. They say a picture is worth a thousand words (see what I did there?), so what is a video worth in your classroom? Videos engage students in the content, set the stage for a lesson, reach more visual modalities, take students places they may never get to, and help them visualize complex concepts.

The biggest problem with using video, especially when assigned as individual assignments, is holding students accountable for what they view. While video is easy to link to or embed, its much harder to make sure students watch a clip in its entirety, don't get distracted by "related videos", or get lost on the world wide web, let alone understand the concepts we wanted them to master from the video.

This post originally started out with the idea of encouraging teachers to look at three really good options for embedding questions into videos as a means of holding students accountable. Unfortunately a post came across my Twitter feed announcing that Zaption was shutting down in September.
As far as I can tell this leaves only two options: EDpuzzle and PlayPosit (formerly known as EduCanon). I tried looking at a third option, Vizia, which is a super simple version of the same idea. But I just couldn't get it to work. The videos took forever to load and when I went to preview it after embedding questions the video never loaded. I'm hoping the developers continue to work on it because it was super simple to use and I love having options.

So now we are down to two options, unless someone leaves me a comment with other ideas. Both of these platforms allow you to import video from a variety of sources (YouTube, Vimeo, Khan Academy, LearnZillion, TedTalks, etc), clip the section you want, and embed multiple choice and free response questions. These interactive videos are then assigned to students. Both offer Google Classroom integration, making it easy to create classes and student accounts. Students then view the video and are stopped at teacher determined points to answer questions. Students cannot advance through the video until the questions are answered. Pretty slick way to hold students accountable!

Your challenge this week is to create an interactive video for your class to use next year. If you need some ideas of how you can use video, check out my blog post 7 Ways to Use YouTube in the Classroom. Then read my reviews on these two platforms (linked in the images below). Each has their own strengths and weaknesses, as well as a different interface. You'll need to try them out to see which one you prefer.


After deciding on a platform, create an interactive video to use in your class. Let me know in the comments how you plan to use the video. Was it difficult to embed the questions? What do you see is the value of a tool like this?

Here is an example of an interactive video I created for a 5th grade class using EDpuzzle.

Read More »

Sunday, July 3, 2016

Share EDpuzzle videos with anyone

EDpuzzle has a nifty feature where teachers can share links to or embed EDpuzzle videos with others who are not in their classroom. Users can watch the video and answer any of the questions, but progress won't be saved back to your EDpuzzle account. This lets the users check their understanding of the video content, and you don't have to worry about muddying up your reports.

To get the share or embed link, click on the My Content tab, locate the video, and click the share icon in the upper left corner. Click the Share with anyone button and copy the link or embed code.


Here's an example of an embedded EDpuzzle video. I used it to introduce a class of 5th grade students to the formula for finding the area of a rectangle. Notice that some of the questions use another feature I love about EDpuzzle: the ability to insert images right into the question.
Read More »

Cool and useful website: PlayPosit

More and more teachers using video in their classroom for good reason. Videos are engaging, are visual, and can really help to explain concepts or illustrate a point. Flipped classrooms are becoming more and more popular and generally utilize videos to teach concepts prior to students coming to class. The problem most teachers find with videos is holding the students accountable for what they see.

Enter in PlayPosit. PlayPosit (formerly known as EduCanon) is an online learning environment where teachers create interactive videos with embedded questions and comments. These interactive videos are referred to as "bulbs". When you grab a video from a source such as YouTube, you can stop the video at any point and insert a question. When students watch the video and get to that point, they must answer the question before they can continue on. The correct answers are graded and the teacher can view the data to determine who watched the video and how well the understood the questions - holding the students accountable for the video viewing.

PlayPosit is free with a few limitations. The premium version lets teachers choose more question types, download worksheets of the questions in the bulb, and advanced cropping. I don't believe that these limitations inhibit the power of the site, though.

To get started go to https://www.playposit.com/join and sign up with a new account or use your Google login, which also gives you Google Classroom integration.

Tap the Design tab and enter the video URL or search through videos for the topic you want. There are also many educational YouTube channels that you can browse through to find the perfect video. You can preview any video or click Use to select it. You can also see other pre-made bulbs for this video.

Click Crop Video and you can drag from the beginning or end to select only a clip.

Play the video and position the cursor where you want to insert a question. Click Add Question and select a question type. The only question types available with the free version are Multiple choice, Free response, and Reflective Pause. Fill in the questions and possible answers. There are basic text formatting tools as well as the ability to upload images and record audio in both the question and answers. Unfortunately it appears that you can only insert one question at any given point.


Before you can assign bulbs to your students you need to create classes and enroll students. Students will create their own PlayPosit account and then join your class using the class code. If you use Google Classroom you can import your classes and rosters. Go back to your Dash and click on Fill Out Profile. Scroll to Google Classroom Sync and click the icon. A screen will appear where you can select which class (or multiple classes) you want to import. Scroll to the bottom and click Save Google Class Room. After refreshing the screen you'll see your students listed.

Click on the Bulbs tab to see all the bulbs you have created. Click Assign on the bulb you want to use and Assign next to the class. Pick a due date for the assignment.

Students can view the videos on the website or through the free iPad app. The app is only for students to view the videos. Teachers cannot use the app to create the bulbs.

After students have completed the bulbs, click the Monitor tab, select the class, and then the assignment to see data for the assignment.

PlayPosit has some great features and is super easy to set up and use. It's comparable to other interactive video platforms such as EdPuzzle. I would love to hear your thoughts and ideas of how you can use a platform like PlayPosit. Let me know in the comments below.


Read More »

Awesome iPad App: Touchcast Studio

Using video in the classroom helps those visual learners master content and keeps them engaged. Unfortunately video tends to be a passive activity where students simply sit and watch. No more! Now with TouchCast teachers (and students) can make interactive videos where students can tap the screen to interact with the video, take a poll, view a website within the video, scroll through a document, and more. Think of it as ThingLink for videos.

TouchCast is a free iPad app that teachers and students and students in most grade levels can use. Here is a TouchCast made by Lindsay Baker (@linzbaker), an educator from California. In this video she models many of the interactive video features available. 


If the interactive part doesn't work, try viewing the video from the TouchCast website at https://www.touchcast.com/baker1123/heres_how_to_use_a_touchcast_in_your_classroom

TouchCast produces a channel called EduCasts that features the best educational TouchCasts being made. These videos will give you ideas of how other teachers and classrooms are using TouchCast. You can view them at http://www.touchcast.com/educasts/ along with lesson plans at http://www.touchcast.com/lessonPlan/

Getting started with TouchCast is easy. Sign up is free for both teachers and students, but does require an email address. Creating a touchcast is done in 5 steps:

1. Scripting and planning

Have students write out a script, planning what they want to say and allowing time (pauses) in the script for vApps to appear on screen and stay there for a few seconds.

2. Filming

Launch TouchCast, make sure you are on the Cast Side, and tap the Start from Scratch theme.

The Effects tab at the bottom of the screen lets you add filters, add guides to help line things up, and add Green Screen.

You can also add Whiteboards where you can annotate on the screen.


3. Editing video clips

All of the clips from filming are in the Projects tab. You can re-order the clips, trim them down, duplicate and add transitions. Put all the clips together in the order you want them to appear in the video. Once individual clips are merged into one large video, import the video back into TouchCast using the Start from Scratch theme again.

4. Preparing interactive content

To add interactive content (vApps), tap the vApps button. Tap any of the apps to customize it and then tap Use. All selected vApps will appear in the vApp tray at the bottom of the screen, ready to use during the touchcast simply by tapping it. They can be positioned anywhere on the screen by dragging it, resized, and changing the options by tapping the gear icon. When everything is done be sure to save the project.

5. Recording the touchcast.

Press the red Record button and start recording, adding the vApps as you go. Tap the Done button when you are finished and you can preview the touchcast. You can always go back and edit the video or the vApps.

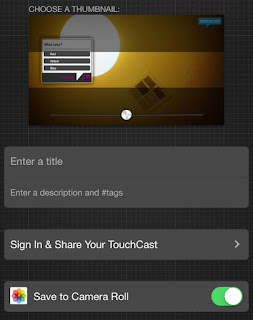
6. Exporting

When everything is like you want, tap Export TouchCast, name the touchcast and press Save. When you are signed in to your account it will save to your TouchCast channel as well as giving you the option to save to the Camera Roll.

There is a lot of power in this little app that allows you and your students to create some high quality videos. It seems to have a little learning curve and certainly requires some pre-planning (scripting), but I think students will enjoy working with it.

In my classroom this year, I plan on having a mini video studio set up in one corner of the room with green screen capabilities. Students will be able to use the iPads to create reports, screencasts, and other projects. I think TouchCast will be a great addition to this area.

Have you used TouchCast with your students? Let me know in the comments what you have done with it.

Read More »

Saturday, July 2, 2016

Awesome iPad App: Videoliscious

Videoliscious is a simple video creation app for iPads. The app is free, but has a 60 second limit. It's simple to use, has a clean interface, and is great for creating short videos on the go.

There are only 3 steps needed to create the videos. The app makes it super easy for students by walking them through each step.

Step 1

Select videos and photos you want to use. These can be from the Photos app or take live video with the camera. It includes a tool to let you trim your video so you can include just the right shot.


Step 2

Add narration to the video. After choosing microphone only, students record their voice as they narrate over videos and photos. The videos and photos chosen in Step 1 appear in the bottom right corner. As the student talks, they tap on each video or picture. These are all combined to make the full video.

Step 3

Add background music from the Videoliscious library. The free version is severely limited in the number of options, but the chosen music is ducked under the narration from Step 2.

Finished videos can only be saved to Facebook, Twitter, YouTube or emailed to the teacher. They are not saved to the camera roll.

This app is straight forward and easy to use. Students can easily master it in a matter of seconds. It's great for short (60 second) projects.  One limitation is where the video is saved. Since it's not saved to the camera roll, the only viable option is to email it to the teacher.

Check out these two blogs for some ideas of how this app could be used in the classroom.

Oral Presentations
Vocabulary

Although the 60 second time limit and inability to save to the camera roll are limitations, I think I will include this app in my video toolbox on our class iPads. I'm excited to share it with my students to see what they come up with. Let me know in the comments how you are using this app with your students!


Read More »

Tuesday, January 19, 2016

Cool and useful website: EDPuzzle

I've been working with a few high school science teachers that use video in their classroom to help students understand some complex science topics. Video is a great way to do this - after all we live in a video generation. YouTube reports 300 hours of new video are uploaded every minute. Leveraging video lets you bring in multimedia and simulations to your lessons as well as take your students to places they may never get to otherwise.

While working with these teachers we explored one of my new favorite tools: EDpuzzle. EDpuzzle is a really cool tool that lets you take existing video and embed your own voice, comments, and even quizzes. Plus it's entirely FREE! Here's a one minute overview.
Creating an account is super simple. Click on the Teacher button and login with your existing Google or Edmodo account or create an EDpuzzle account from scratch. Using your Google or Edmodo account gives you the advantage of being able to access class rosters and other resources directly from those accounts.

My Classes


Your first task after signing in is to create your classes. If you signed in using Google or Edmodo you can import your existing classes. Otherwise click the Add Class button and follow the prompts.

Find Videos

The next step is to find the video you want to use. Click the Search tab and choose your favorite source for videos. You can also use the Upload button to upload your own video or video you've downloaded from another source.

After you find a video, hover over the thumbnail and either click Use it to start adding your content, or click Copy to add it to your My Content tab and edit it later.

Create your video-lesson

Once you are in your video its super easy to create your lesson. Once you are in edit mode you'll see four buttons across the top of the window.

Crop - lets you use only a section of you need. No need to force your students to sit through an entire 15 minute clip, just crop to the relevant section. To crop, just drag to start and end points.
Audio Track - is used if you want to use your own voice on the video instead of the embedded audio. If you use this option you have to record audio for the entire video clip. Click the microphone button and the video plays at the same time you are speaking.
Audio Notes - lets you record your own commentary at a certain point of the video. Drag the playhead to the point in the video and click the microphone button. You can have multiple audio notes throughout your video.
Quizzes - this is probably the best feature of EDpuzzle. Click on the point in the video where you want to embed a quiz and click the question mark. You can add an open-ended or multiple choice question, or embed your own written comment. The question editing box gives you basic formatting tools as well as the ability to embed links and images into the questions. When students are watching the video, it automatically stops at the quiz and students are forced to answer it before continuing on.

Assign

Click the Finish button in the upper right-hand corner. You'll be prompted to select a class to assign the video to as well as a few other awesome features: You can disable skipping so that students can't skip important content. You can also assign due dates to videos.


When you click the Send button it assigns the video to your EDpuzzle class. If you linked your Google Classroom or Edmodo accounts, you need to take the additional step of clicking the Post button and it will appear in the class stream.

EDpuzzle is a must-have tool for any teacher that uses video in their classroom. I love the ability to embed quizzes to hold students accountable for the video content, as well as the ability to disable skipping.

What are some ways you can think of to use video in your classroom? Let me know in the comments below.

Read More »

Saturday, October 24, 2015

Let YouTube rock your classroom

Today I joined Karl Gustafson (@lvmachead) to present at the CCSD Google mini-conference at Roy Martin MS. Our topic was using YouTube in the Classroom. Our goal was to share practical ways to use videos to engage students. We also shared ways to find videos and collect them in playlists for easy access

I've embedded the presentation below. The presentation is mostly for resources to use back in the classroom. The workshop itself was a hands on workshop, working through many of the techniques described here.


Read More »

Thursday, October 22, 2015

7 ways to use YouTube in the classroom

YouTube currently has over one billion users, with those users watching over six billion hours of video each month. 300 hours worth of new video is uploaded every minute. It's estimated that the average time spent on a session by mobile YouTube users is 40 minutes. (source) That's a lot of video time! Clearly video is a big thing and isn't going away soon. 

How can teachers harness the power of video? James Sanders has created a presentation 10 Ways to Use YouTube, that has given me a lot of ideas. I've shared some of them here and added a few of my own.


1. Hooks and discussion starters

Start a lesson or discussion with a video that grabs your students' attention. YouTube videos are great for engaging your students, bringing in different perspectives, and encouraging students to consider new viewpoints. This Hot Wheels video could be used to introduce a lesson on the laws of motion or a physics lesson.


2. Critical Thinking

Visual imagery produced by videos is a great way to get students thinking critically. This commercial was produced by Honda to advertise their cars. After viewing it let them play with critical thinking. What's the bigger idea here? What's Honda trying to express about its company? What can the student infer?


3. Exam Review

Use videos to help students review material or study for a test. Create a video with "flash cards" to help students practice vocabulary the night before a big test. Here is one example of using YouTube to review for exams.


4. Flip your classroom

Use video to flip your classroom. Have the students watch a video as homework to understand the basics of a concepts. When they come in to class, expand on their learning experience by applying the information they learned. After watching this video on tectonic plates at home, students could create a model to show movement.


5. Bring the world to your classroom

Bring the world to your students. Many will never have the opportunity to see far away places, experience unique environments or see experiments in action. Use videos during a lesson or unit so students can see what something is actually like, rather than just reading about it.


6. Link videos

Within a video's settings you can add links to other YouTube videos that allow you to create engaging interactive experiences. Here's one that was professionally created.


Here's another one teacher James Sanders put together to help his students learn about chemical reactions. James shows how to do this here.


7. Create interactive videos

Use a service like Edpuzzle or Zaption to create interactive videos. With these services you can embed your voice, add questions, keep students from "skipping" through the video, and gather student viewing data. This is an easy way to hold students accountable for the videos you share with them.


Jim Sill leads many workshops on harnessing the power of video in the classroom. He has compiled a list of creative ways teachers have used videos - everything from cultural bias to risk taking to metaphors. Browse through the list for some very creative ideas. https://sites.google.com/site/mistersillytintheclassroom/footprint/hook-em-playlist

Do you use video in your classroom? What are some ways you can engage students through this medium?
Read More »

Monday, November 4, 2013

Saving YouTube Videos

It seems like everyone has a lesson, how-to, demonstration, or other exciting video that they've posted on YouTube. These come in handy when you are teaching a concept and need a little additional information to enhance that lesson. Unfortunately in my district YouTube is blocked. But with the help of the Internet you can download that cool video at home and still show it during your lesson.

Ideally, to get through the district filter the YouTube video should be tagged for educational use. You can usually contact the author of the video and ask them to add that tag. You can also submit the video through YouTube EDU's submission form.

If you are unable to do that, or need it quicker than the email back and forth, you can use a site like http://www.keepvid.com to convert and download the video. Best of all-the site is free! You will need to follow these steps at home, since you still need to access the YouTube video.

To start you need to navigate to the YouTube video you want. Copy the URL for that video from the address bar.

Go to http://www.keepvid.com and paste in that URL in their search bar. It should look something like this.

Then click the Download button to the right of the search bar. Don't click any Download buttons below the search bar - those are ads and you'll end up downloading some junky software.

After click Download you may need to accept a security warning about Java. It's okay to Trust it - I've done this hundreds of times without any problems.


After the Java applet runs you'll be presented with a choice of file formats. Always go with the mp4 file format. The 480p is in the 4:3 aspect ratio and a smaller file size. This is usually good enough for my needs. 720p is in the 16:9 aspect ration and a much higher quality (and file size).

Click the link for the file format you want and it will download the video to your computer. Transfer that video to a flash drive and take it to school!

Keep in mind that the video is not yours to keep. I only offer this tip as a way of getting around the district filter for content you know is acceptable and useful in your class. Once you've shown the video be sure to delete it and also give proper credit to the author!

Read More »