Showing posts with label Edmodo. Show all posts

Tuesday, March 24, 2015

Edmodo Part 17: Grading discussions and comments

This post is the next in a series of posts to help schools and teachers that I work with get started with Edmodo.

Edmodo is a powerful tool for engaging students in meaningful conversations. Posting and commenting are easy tasks for both teachers and students. Sometimes as a teacher, you still need to draw a grade from the discussion. Assignments and quizzes have grading functions built in, but there isn't an easy way to hold students accountable for posting and commenting. The best way to do this is to use a rubric.

In order to use a rubric on a discussion or a comment you will first need to create an assignment in the gradebook. Check out my previous post Edmodo Part 5: Gradebook for directions. Your assignment might look something like this.


After creating an assignment you can then use a rubric to score the post or comment. Your rubric should be designed to capture what information you are looking for. Do you care about spelling and grammar? Or are you more concerned about the content and effective discussion? Here are two examples of rubrics that are designed specifically for Edmodo.

Example 1 (Word doc)
Example 2 (PDF)

After completing the rubric, enter the scores in your gradebook under that particular assignment.

Using rubrics to assess student posts and comments is a great way to ensure quality posts and commenting.


Read More »

Monday, January 12, 2015

Edmodo Mini Lessons

Showing teachers the potential of Edmodo and how easy it is to post quizzes, assignments and discussion is the beginning part of training. However, teachers sometimes find it difficult to actually use Edmodo long term or in effective ways with their students. It's always nice to hear fresh ideas on how to use Edmodo.

Edmodo has some great examples of mini-lessons they posted on their site. These are actual ideas teachers have used with their classes. Here are a few ideas from that post.


  • Students write a definition for foreshadowing, watch a short film looking for evidence of foreshadowing, and then posting their observations.
  • Embed examples of book trailers for students to view. Create a folder with links to resources. Have students create their own book trailer and post it on Edmodo.
  • Link a video documentary or video commentary about a current or high interest event from any news magazine website. Students must then write a paragraph that either supports, opposes, or offers a new argument.


You can check out the full post at https://support.edmodo.com/home#forums/20837385-mini-lessons

I'd love to hear how you use Edmodo with your classes. Leave a comment below and let me know!
Read More »

Thursday, December 11, 2014

Edmodo Part 16: Link Your Google Drive

This post is the next in a series of posts to help schools and teachers that I work with get started with Edmodo.

If you use Google Drive you can link it to your Edmodo Library. With this method you can store and organize your files in Google Drive and then share them with your groups. This could save you a lot of time and keep all your resources in one location.


  • Click the Library icon.
  • Select Google Drive.
  • Click the Connect with Google Drive button and you will be prompted to sign in to your Google Drive Account.
  • Select Accept when prompted about Edmodo permission to access your Google Drive. Now you can access your Google Drive files just like you can any other resources in your library.
Students can also link their Google Drive account to Edmodo. Students don't have a Library icon, but instead have a Backpack icon. Otherwise the process is the same.


You can find more detailed instructions on using Google Drive in the Edmodo help files.

Read More »

Tuesday, December 9, 2014

Edmodo Part 15: Library

This post is the next in a series of posts to help schools and teachers that I work with get started with Edmodo.

Your Edmodo Library is like having a Dropbox or Google Drive attached to your Edmodo account. You have unlimited file storage and can upload any type of file or link to any website. With items stored in your Library you can then attach them to any post or assignment or share them with any of your groups.


  1. Click the Library icon on the top toolbar.
  2. You'll see all of the resources saved to your library. You can Filter by file or link and View by icon or list.
  3. To add items to your library simply click Add to Library. You will be prompted to either upload the file or put the URL of a website or resource.
  4. If you have attached your Google Drive you also have access to any files saved there.


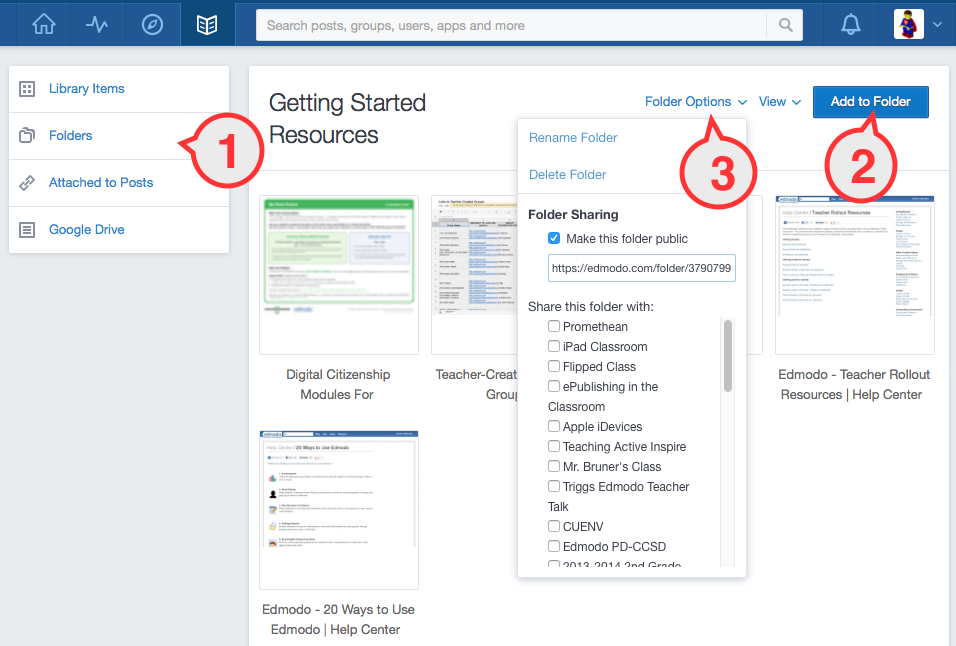
  1. Resources can be organized into any number of folders. Click the Folders tab and then create folders as needed.
  2. Once inside a folder you can click Add to Folder and add resources directly to that folder.
  3. Resources, including entire folders, can be shared with any group by selecting Folder Options and selecting the group(s) in the list. Group members see a Folders icon in their group. Clicking that then shows the shared folders and resources. Shared folders/resources do NOT appear in their Library/Backpack.

You can add single resource items to any post or assignment by clicking the Library icon and selecting the item.

Bookmarklet

Normally you have to be in your Edmodo Library to add resources. Edmodo has created a bookmarklet that makes it easy way to add web content to your Library from any website. Once you have the bookmarklet, you can simply click on it to bring up a sharing screen where you will be able to choose which folders to put the resource in, and whether or not you want this resource to be shared with your Edmodo connections.

Check out this Edmodo blog post to find out how to add the Edmodo Bookmarklet to your browser of choice.

You can find more detailed instructions on using the Library in the Edmodo help files. 
Read More »

Tuesday, November 25, 2014

Edmodo Part 14: Personalize your avatar

One of the funnest things about having an online social presence is the avatar that goes with your account! Avatars tell a lot about someone's personality. It appears next to your name on every post and gives others a visual clue as to the author of that post.


This post is the next in a series of posts to help schools and teachers that I work with get started with Edmodo.

One of the funnest things about having an online social presence is the avatar that goes with your account! Avatars tell a lot about someone's personality. It appears next to your name on every post and gives others a visual clue as to the author of that post. 

When students and teachers first create their Edmodo account they are given a boring, generic, gray avatar. Luckily there is an easy way to give your avatar some personality.

If you have yet to update your avatar you'll see a message just below it. Click that message.

If you've already modified it and just want to update it, click the small avatar in the upper right corner and click Profile. Hover over the avatar on the left side and click the pencil icon.


  1. Upload a photo or graphic.
  2. Click Personalize Avatar to customize a cartoon doppelgänger.

You can customize the background, shirt, head shape, hair, eyes, and mouth. Click on an element to see other color choices. Once you are happy with your avatar, click Save, then Update.Teachers also have the ability to remove a student's profile picture if you find that it was inappropriate. Directions can be found in the Edmodo help files.


Read More »

Friday, November 21, 2014

Edmodo Part 13: Notifications and Filters

This post is the next in a series of posts to help schools and teachers that I work with get started with Edmodo.

After posting assignments, quizzes and Snapshots to your Edmodo groups, it would be nice to have notifications letting you know about new posts or work that has been turned in. Edmodo has a helpful Notification icon that gives you a visual reminder of recent activity.

A number will appear on the icon indicating how many notifications you have. The types of notifications depend on whether you are signed in as a student or teacher, but generally you will be notified about replies, assignments, quizzes, Snapshots, grades and badges.

  1. Click the Notification icon to see a list of notifications.
  2. Notifications in gray are new, unread notifications.
  3. Notifications in white are previously read. Click on any notification item to go directly to that post or to reply back. 
  4. Click View Categories to view only a certain type of notification.
  5. Hide or dismiss the notification by clicking on the X that appears to the right when you hover over the notification.

You can find more detailed instructions on using Notifications in the Edmodo help files. 

Read More »

Thursday, November 20, 2014

Edmodo Part 12: Student Backpack

This post is the next in a series of posts to help schools and teachers that I work with get started with Edmodo.

The Edmodo Backpack is a virtual storage space where students can store files and links. These resources can then be accessed from any web connected device. Students can add files and links from their Backpack to any note or assignment. Students have unlimited storage space, although there is a file size limit. Check out this Edmodo help video for a quick overview.

The Backpack is accessed from the backpack icon on the upper navigation bar.

  1. Any resources already added will appear in the main window.
  2. Click Add to Backpack for an upload dialog box (see below).
  3. Folders can be created to group resources.
  4. If students have a Google Drive account, they can connect to their Drive and access all their files and folders stored there.

Upload files

After clicking the Add to Backpack button the upload dialog box appears. Click the Files tab and follow the prompts to upload your file.

Click the Links tab and enter the URL of the website. It will automatically add the title of the website or you can change it to something that makes sense to you.

If you want to add a resource to a post, click the Backpack icon that appears at the bottom of the post.

You can find more detailed instructions on using the Student Backpack in the Edmodo help files. 
Read More »

Monday, November 3, 2014

Edmodo Part 11: Badges

Edmodo badges are easy ways to provide recognition to individual students for their achievements. Edmodo includes several pre-made badges such as Good Citizen, Hard Worker, and Participant among others. Teachers can create their own custom badges and use those as well.

Badges are not graded. They are simply another way of recognizing students. Think of badges as a way to gamify student learning. Badges can be used as rewards or as a way to let students know they’ve accomplished certain requirements. Teachers can assign badges for any reason.

Creating Badges

  1. Go to https://www.openbadges.me/designer.html to design and create a badge icon. You can use the site to add text and customize the look of your badge. Download the graphic to your computer.
  2. In Edmodo click on the Progress tab at the top of the screen and select My Student Badges. Click the Create Badge button.
  3. Enter a title and description for your badge. Upload the picture you saved in step 1.

Assign Badges

awarding student badges


  1. From the Progress tab at the top of the screen select your class or group. 
  2. Click the Badges tab.
  3. Click the Add a Badge to this Group button and select the badge you want.
  4. When you are ready to award a badge, simply click in the box for that badge and student.

Student View


Students can see badges they’ve been awarded from their profile page. Simply click on the small avatar in the upper right corner and select Profile.

Integration Ideas

Badges can be used to recognize students for any reason. In this presentation from the 2014 EdmodoCon a 7th grade writing teacher uses badges to help his students through the writing process.


Other ways badges can be used:

  • Online Help: award to students who go out of their way to help others on Edmodo.
  • Parent Badge: award to students who’s parents made their Edmodo account.
  • Creative Commons: award to students who understand copyright when using images.
  • Digital Citizenship: award badges to students that complete digital citizenship activities.
  • 25 Posts: award to students that reach 25 useful posts or comments.
  • Writing Process: award to students as they complete each step of the writing process.


Teachers can find more information about badges, including how to share badges with other teachers, at https://support.edmodo.com/home#forums/20805855-badges.

Are you ready to get started with badges? Download the Edmodo Badges Technology Integration Challenge and see what you can do!
Read More »

Monday, October 20, 2014

Edmodo Part 10: Go Mobile!

This post is the next in a series of posts to help schools and teachers that I work with get started with Edmodo.

Did you know you can access your Edmodo account from any mobile device? Edmodo's mobile app is a great way to stay on top all your Edmodo work while on the go. They have a version for iOS, Android, and Windows 8. This is great for 1:1 iPad classrooms or shared device environments.


Although the layout is optimized for touch screens, you can still perform all of your important Edmodo tasks right on the device. Teachers can:

  • Create and join Groups
  • Post to Groups
  • Check Notifications
  • Access Libraries
  • Track Progress
  • Set Alerts
  • Create Polls
Students will be able to perform most tasks as well. They can:
  • Post to groups
  • Turn in assignments
  • Take quizzes
  • Take Snapshots
  • Take polls
There are a few limitations for both teachers and students. For example, I could not edit my profile and you cannot award badges through the mobile app. I'm sure more features will be added during future updates.

You can find more detailed instructions about the mobile app in the Edmodo help files.

Read More »

Monday, October 13, 2014

Edmodo Part 9: Scheduling Posts

This post is the next in a series of posts to help schools and teachers that I work with get started with Edmodo.

With all the work that teachers have to do, wouldn't it be nice to have your Edmodo posts all planned out and ready to go? If you post that quiz too early, students might take it before they (or you) are ready! The ability to schedule posts can really help you become organized and stay on top of things. Here's a quick video explaining how it's done. 


Any kind of post can be scheduled: notes, assignments, quizzes, and polls.


  1. Click the Schedule icon.
  2. Select the day and time that you want the Post to be sent and click OK.
  3. Click Send.
You can find more detailed instructions on Scheduling Posts in the Edmodo help files.

Read More »

Monday, October 6, 2014

Edmodo Part 8: Parent Accounts

This post is the next in a series of posts to help schools and teachers that I work with get started with Edmodo.

Parent accounts on Edmodo are a great way to communicate with parents and offer a level of transparency for your class. There are two ways parent accounts can be useful for your class.


First, with their Edmodo account parents can see what assignments and grades their child has. This enables them to stay on top of their child's work and be actively engaged in their education. Parents can only see their child's work and cannot see posts in the main Edmodo message stream for your groups. This ensure a level of security and privacy since there is no way for an Edmodo parent to interact with another child other than their own.

Second, teachers can send messages to parents by posting Notes to the Parent's Group. Instead of typing up and printing out a weekly newsletter describing classroom events and activities, teachers can simply post this same information to the Parent Group.

This 3 minute video describes what Edmodo looks like from a parent account.


Parent accounts are easy to set up. Here is a sample letter you can send home to parents describing Edmodo and how it will be used in the classroom. The second page has directions parents will follow to create their account. Since each parent account is tied to their child's account, they will need to enter a unique code. To get that code, follow these directions.


  1. Open your class group and click on the Members tab.
  2. Click Member Options near the top of the page.
  3. Click Print.
  4. Select Parent Code and click Generate Page.

After printing the codes you can hand write them on the handout above prior to distributing to parents.

Just like with your student groups, you can send Notes with or without links and attachments, and even schedule them. To send to the parent group, start typing the name of your student group and you'll see group_name (parents) in the list.

How do you know which parents have created their account? Go to your group page and click the Members tab. Each student who has a parent with an account will have a little "Parent" icon next to their name.

You can find more detailed instructions on Parent Accounts in the Edmodo help files.

Read More »

Sunday, September 28, 2014

Edmodo Part 7: Small Groups

This post is the next in a series of posts to help schools and teachers that I work with get started with Edmodo.

Now that you've been using Edmodo, you've discovered how powerful it can be for creating engaging lessons and tracking student work and progress. How about if you want to be able to differentiate assignments for your students? Edmodo allows you to create Small Groups within your main group. These small groups could be created so students could collaborate on assignments, to post different assignments based on ability or level, or for any type of grouping strategy you want to employ. Check out this short video to see how it easy it is to create Small Groups.


Here are a few suggestions on how you can make use of Small Groups in Edmodo. Let me know in the comments if you have any other ideas!

  • Create small groups for different novels students read and discuss. 
  • Let students help each other using Small Groups. For instance, when they are working on a literary genre project, create Small Groups for each assigned genre (e.g. romance, science fiction) and have group members post the best resources they each find.
  • Use Small Groups when students are working on creating book trailers, by creating a Small Group for each type of software (e.g. Animoto, MovieMaker) and have them post problems as well as tips/solutions they learn.
  • Use Small Groups to prepare for a debate. Create two small groups and divide students accordingly. Assign each small group a specific stance on a chosen issue. Have students research the issue. Within their small group, student can discuss and post their finding, without the opposing group being able to view.
  • Use gamification and Small Groups to "level-up" your students. Check out more details on this idea.
What other ways could you use Small Groups?

Read More »

Monday, September 22, 2014

Edmodo Part 6: Snapshot

This post is the next in a series of posts to help schools and teachers that I work with get started with Edmodo.

If you want a quick and easy way to assess your students progress on the CCSS, Edmodo's new Snapshot tool is for you. Snapshot is a new micro-assessment tool that allows you to quickly create short, CCSS targeted formative assessment quizzes. Snapshots can be assigned to large or small groups, are automatically graded, and can target any of the CCSS in grades 3-12.

This 4 minute video gives you a good overview of Snapshot.


Create a Snapshot

Creating a Snapshot is super easy. You can create one by clicking on the Snapshot tab in the main message area or by clicking on the Snapshot icon on the far right of your screen.
  1. Select a student group.
  2. Choose the subject.
  3. Choose the grade level.
  4. Select the standards you want and it will add 4 questions per standard.
  5. Name your Snapshot, add a due date, and create a time limit. Add a note if desired. For example at the beginning of a unit you might add "I know we haven't covered this material, but I want to find out what you know."
  6. Click Student Preview to see examples of questions students will be asked. When you are satisfied click Assign Now or Plan Later.
Snapshots appear just like any other assessment in the student's post stream when they log in.

Schedule

Snapshots can be created and scheduled for a future date. When you launch Snapshot and click on the Schedule tab you'll see all of the Snapshots you've created.
Source: Edmodo

Reports

Viewing student results is just as easy as creating the Snapshot. After you launch Snapshot click the Reports tab. There are 3 types of reports showing you how many students have taken the Snapshot and how the group did overall, individual student results, and how students performed on each standard.

From these reports you can quickly see which students still need help on certain standards. Edmodo even links to other online resources that might help you teach those standards.

You can find more detailed instructions on Snapshot in the Edmodo help files.

Are you ready to try out Edmodo Snapshots? Download the Edmodo Snapshots Technology Integration Challenge and see what you can do!

Read More »

Monday, September 15, 2014

Edmodo Part 5: Gradebook

This post is the next in a series of posts to help schools and teachers that I work with get started with Edmodo.

Now that you've created assignments, quizzes, and polls, you need a way to track scores and progress. Edmodo has a built in grade book that will do this for you. They refer to the grade book as Progress and it can be accessed from the main toolbar.

Select the group you want. You'll have a list of students down the left side and assignments across the top. The grade book scores will appear as you grade assignments and as students complete quizzes. From this screen you can do several things.
  • You can click a student's name and see their individual progress.
  • You can edit a grade directly by clicking in that cell and entering the information.
  • You can add assignments from outside of Edmodo by clicking the New Grade button.
image source: support.edmodo.com

You can find more detailed instructions on polls in the Edmodo help files.

Read More »

Wednesday, September 10, 2014

Edmodo Part 4: Polls

This post is the next in a series of posts to help schools and teachers that I work with get started with Edmodo.

In previous posts in this series on Edmodo, I showed how to use assignments and quizzes to assess student work. Polls are another effective way of gathering immediate feedback and assessing background knowledge. Polls are anonymous and students can select only one answer. Polls are just as easy to create as assignments and quizzes too!

Post a Poll


  1. Type the poll question.
  2. Enter possible answers. Click the Add Answer button if you need more options.
  3. Enter the group name and schedule the poll, if desired.
  4. Click the Send button.

Student View


When you post a poll it will appear in the student's Edmodo feed.
The student simply selects their choice and clicks the Vote button.

View Results

Locate the poll post and view the results. You can see how many students have participated and can refresh the results if you are viewing the results in real time. You can also Reply to leave a note for your students about the poll or it's results.

You can find more detailed instructions on polls in the Edmodo help files. 

Technology Integration Challenge


In the last three posts you've learned about different assessments using Edmodo. Download this Technology Integration Challenge and see what you can do!
Read More »

Tuesday, September 9, 2014

Edmodo Part 3: Quizzes

This post is the next in a series of posts to help schools and teachers that I work with get started with Edmodo.

In the previous post in this series on Edmodo I explained how to post assignments that can be graded and used for assessments. Another type of assessment Edmodo supports are quizzes. Quizzes are just as easy to create as assignments, but are excellent ways of assessing mastery of lessons. Quizzes can be multiple choice, true/false, short answer, fill in the blank, or matching. These directions will walk you through creating a quiz and posting it to your group.

Select the Quiz tab and click the Create a Quiz button.


  1. Create a title for your quiz.
  2. Click the Add First Question button.


  1. Select a question type and type the first question.
  2. Fill in the answers and mark the correct one.
  3. Click the + button to add more questions.
  4. Decide if you'd like randomize the questions for each student. Show Results lets students see their results immediately after completing the quiz.
  5. Click Assign Quiz. 


  1. Select a due date and check if you want it added to your Edmodo grade book.
  2. Enter a group to post to, schedule it if you want, and click Send.
When students log in to their Edmodo account, they then see a Quiz post and click the Take Quiz button. Once they quiz is completed they add a reaction and click Submit.

Grading Quizzes

After students complete the quiz, go to the Quiz post and you'll see a Turned In button. This will take you to a Quiz Overview page. Multiple choice and true/false quizzes will already be graded and entered into the Edmodo grade book. You can click on a student's name to grade short answer questions and to leave comments on any student's quiz.

You can find more detailed instructions on quizzes, including sharing and printing, in the Edmodo help files. 

Are you ready to try out Edmodo quizzes? Download the Edmodo Quiz Technology Integration Challenge and see what you can do!
Read More »

Monday, September 8, 2014

Edmodo Part 2: Assignments

This post is the next in a series of posts to help schools and teachers that I work with get started with Edmodo.

In my previous Edmodo post, Edmodo Part 1: Getting Started, I briefly described how to post a note to your groups. Posting notes is the easiest way to get the discussion going within your virtual classroom. With the ability to attach files or website links, a teacher can easily share resources, such as classroom notes or blended learning videos, directly to  members of the group.

Notes are great for discussions or collaborations, but let's face it, teachers need to be able to grade student work as well. Posting quizzes and assignments, complete with resources and due dates, are some of the other things you can post to Edmodo. These become part of student calendars and grade books. I'll address quizzes in the next blog post and focus on assignments here.

The biggest difference between notes and assignments is that notes are used for communication and collaboration. There is no accountability other than the teacher manually tracking who has contributed to a discussion. Assignments, on the other hand, are used for grading because they can have due dates and also appear in the Edmodo grade book automatically. Follow the steps below to create an assignment.

Post Assignments

  1. In your Edmodo feed click the Assignments tab.
  2. Type in a name for the assignment and then type the actual assignment.
  3. Select a due date. These dates appear in the student's Edmodo calendar.
  4. Type in the group name.
  5. Similar to notes, you can attach a file, hyperlink, or item from your Edmodo library. You can also schedule when the assignment will appear.
  6. Click Send. 

Student View

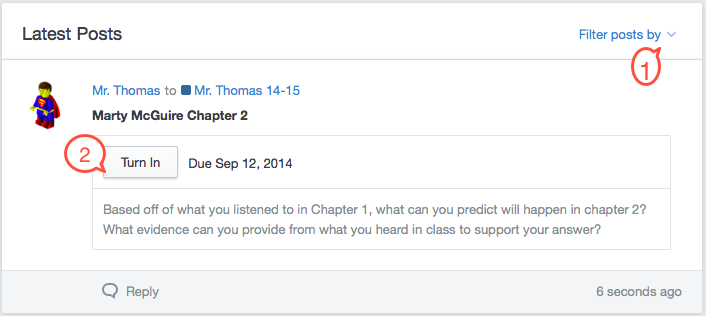
When you post an assignment it will appear in the student's Edmodo feed.
 If they have a lot of posts in their feed they can use the Filter posts by menu to select Assignments. The student clicks the Turn In button and follows these steps to turn in their assignment.

  1. Type a message in the text box.
  2. Select a reaction to the Assignment.
  3. Attach any files, links, or items from the student's Backpack.
  4. Additional comments are optional.
  5. Click on “Turn in Assignment."

Grading Assignments

After students have submitted assignments it's easy for a teacher to view and grade them. Locate the assignment post and click the Turned In button.
  1. Select the student from the list.
  2. Enter a score.
  3. Select a reaction.
  4. Enter a comment about the submission or attach a file (optional).
  5. Click Grade.
Teachers can find more information about assignments, including edit, deleting, and sharing, and reusing assignments at https://support.edmodo.com/home#forums/20796115-assignments.

Are you ready to try out Edmodo assessments? Download the Edmodo Assessments Technology Integration Challenge and see what you can do!

Read More »

Tuesday, September 2, 2014

Edmodo Part 1: Getting started

This is the first in a  series of posts to help schools and teachers that I work with get started with Edmodo.

Edmodo is a free online learning platform that takes the ideas of a social network and refines them for classroom use. Using Edmodo, students and teachers can connect with each other to share ideas and collaborate. Teachers can assign and grade work. Students can respond to prompts, quizzes, and polls. Ideas can be shared in a safe, bully free environment. Edmodo can be used with virtually any grade level. This post will help you get started using Edmodo with your class. This 5 minute video is an over view of Edmodo.

Sign up

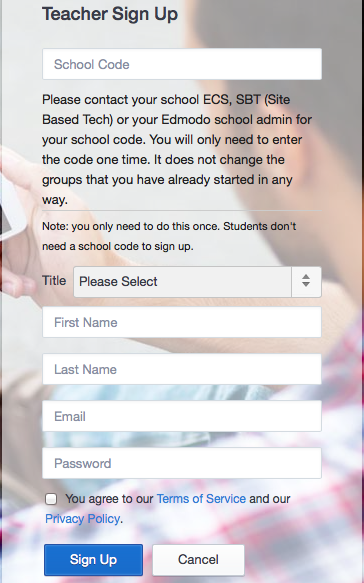
The first thing you'll need to do is create your Edmodo account. CCSD teachers should go to http://ccsd.edmodo.com. Click the I'm a Teacher button and fill in the necessary information. You'll have to get the school code from the Edmodo admin at your site.
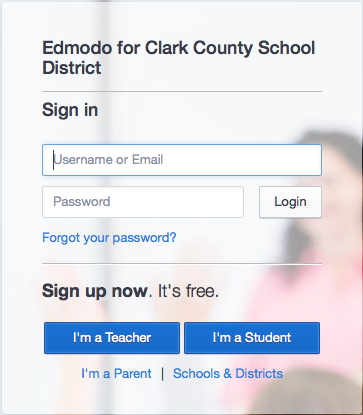
sign in screen
teacher account creation 

Edit your profile

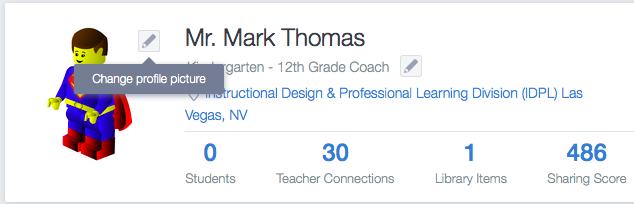
Once you have created your account you can customize your profile. Click on the Account icon in the upper right hand corner and select Profile. When you hover your mouse over the different profile area a pencil will appear. Clicking that will allow you to edit your profile picture and information.
edit your profile

Create a group

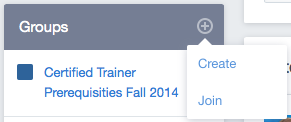
Before your students can use Edmodo you will need to create a group. You could create a single group for your class or one for each period. On your Edmodo home page find the Groups section on the left side, click the plus sign and select Create.
create a group
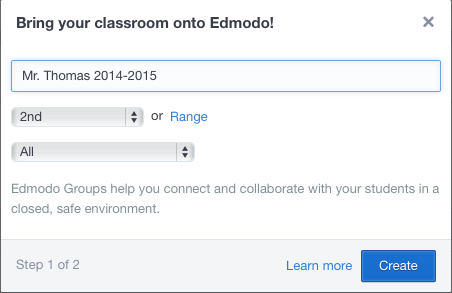
Type in a name for your group, select the grade level, and choose a subject. Click next and select a group size. Your group is now created and you'll be taken to the group's home page.
name your group
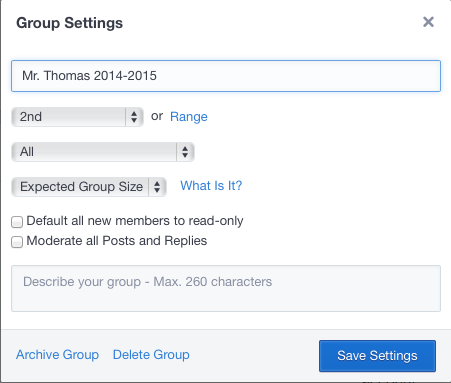
Click the gear icon next to the group name and select Group Settings. You can change information about the group and select options to have it read only or moderate the posts. When you choose moderate you will receive an email every time a student creates a post or a reply. You must then approve the post or reply before it will appear in the group message stream.
group settings

Sign up students

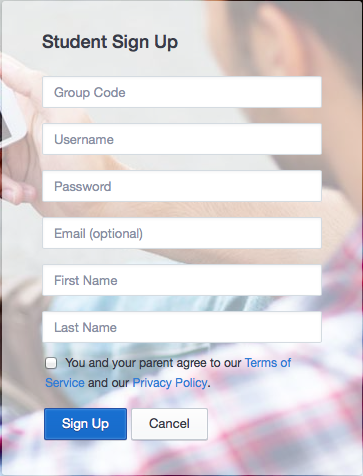
Right below the group name is the group code. Make a note of this code. Students will need to enter it when they create their accounts. Depending on the age of your students this could be done in the computer lab, as a center, or, for younger grades, with the help of an older student or parent helper.

At the Emodo login screen have the students click the I'm a Student button. Students fill in the necessary information and enter in your group code. It's not necessary for students to enter an email address. Have students use their student number for their username and a password that they can easily remember. As the teacher you have the ability to assign or reset a password if they forget it.
group setup

Basics of posting

Posting messages is the main feature of what makes Edmodo great. You have the ability for you and your students to post and respond to other posts easily and in real time. It is very easy to do and very helpful. Take a look at the Comment Box found at the top of your homepage. I'll take a look at the other tabs in future posts, but for now stay on the Note tab.

It is pretty easy to see what you need to do. Type your message in the larger blank box. Then where it says Send to... type in which group or person you want to send the message to. Right underneath that section are a series of buttons that let you attach files, hyperlinks, items from your library, and schedule the post. Once you're finished with your message click Send and you’re done!

What can you do with Edmodo?
Search the internet and you can find a ton of ideas for using Edmodo in your classroom. Here's a list of some things you can do.

  1. Post assignments, with or without attaching files.
  2. Have students post book reviews.
  3. Provide links to websites students need for further study.
  4. Give students a quiz to determine understanding.
  5. Have students collaborate on a writing assignment.
  6. Have students respond to writing prompts.
  7. Post a video and have students respond or critique it.
  8. Connect with other classrooms during the Global Read Aloud.
  9. Role Playing: Help students understand key historical and literacy events by reenacting them through role playing activities in Edmodo.
  10. Peer Reviews & Critiques: Place students in small groups and have them post their work to their group for peer review and feedback.
  11. Writing Projects: Enable students to tap into individualism and build self-esteem by sharing their writing projects with each other in Edmodo.
  12. Build Digital Citizenship Skills: Enforce online etiquette guidelines for students when using Edmodo to help them build digital citizenship skills.
  13. Book Reviews: Encourage students to read and discuss novels with each other.
  14. Cultural Exchange Projects: Give students the opportunity to learn about other world cultures by connecting your classroom with classrooms around the globe via an Edmodo group.
  15.  Sub-Hub: Use Edmodo to communicate with your students when you’re out of the classroom, or provide updates to students who are absent from class.
  16.  Science Probes: Promote discussions and bring more interaction to your science class by engaging your students with science probes.
  17. Current Events: Help students stay up to date on the latest news by posting current events or having students contribute news they discover.
                  Are you ready to get started with Edmodo? Download the Edmodo Technology Integration Challenge and see what you can do!
                  Read More »