Showing posts with label Tech Integration Challenge. Show all posts

Monday, June 27, 2016

Awesome iPad App: Spark Page

Adobe recently recently rebranded several of their apps and now collectively calls them Adobe Spark. With Adobe Spark students can communicate ideas and learning with stunning visuals and multimedia, each focusing on a different presentation format (video, social media, and web page). I believe all three apps should be a part of everyone's presentation toolbox. All three Spark apps make it easy to create professional looking presentations that include stunning images, videos, and text.

I previously wrote about Adobe Voice (now rebranded as Spark Video), which is used to create amazing student narrated videos. Today I played with Spark Page and found a new favorite presentation app. Students can add pictures, videos, and text to create polished web stories with magazine-style themes. It’s so simple and easy to use that students in most grade levels and across all subject areas can use it.

It is available as a free app for mobile devices and also has a web page. Students can log in with an email address or their GAFE accounts. Projects are synced across all devices.

I embedded a short presentation I created while practicing with Spark Page. It was super easy and looks great!Antelope Island

Once students are logged in, either by creating free account or signing in with their GAFE credentials, they create their first project by tapping the + button at the bottom of the screen. From this main screen students can also view sample projects from the gallery and have quick access to their saved pages.

Students are then prompted to add a title and a cover picture.
 
When selecting images for any part of the project, students can choose from a variety of sources, such as the camera, Photos app, and even search high quality, creative commons photos.

Students can then start adding a variety of elements to their Spark Page, including images, text, links, and videos. One of my favorites is glideshow, where students add several images and they slowly transition as the user scrolls or swipes up the web page.

Adding links creates a button, that when tapped, take the user to other websites for additional information. Students just need to add the text for the button and the URL for the website.

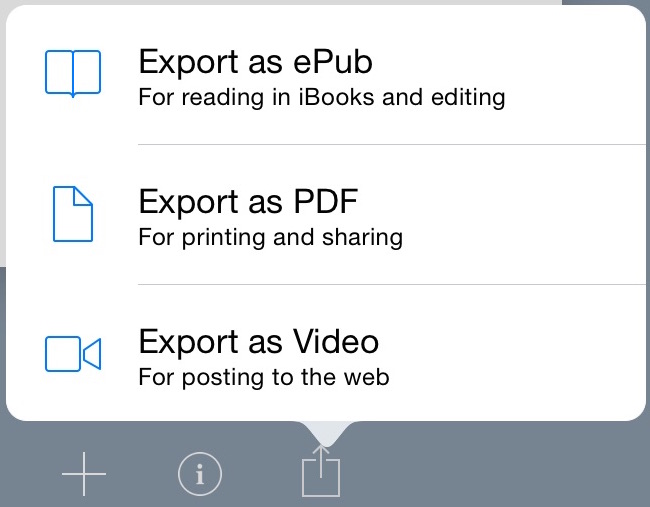
When the project is done, students tap the share icon and choose their settings. Projects can be public or private. They must select a category and can add their information as the author of the post.

Projects can be shared by copying the link to the clipboard and sending to the teacher or embedding it on a website, like I did above.

Integration Ideas

This is the perfect app for students to use when presenting any type of information or report. Some examples could be:
  • Create an All About Me story
  • Summarize a chapter
  • Recount a story
  • Share a biography
  • Create a how-to video
  • Present a position on a topic
  • Cultural explanations
  • Journal of field trip
  • Book trailer
  • Descriptive language practice
  • Create a dictionary

Download the Tech Integration Challenge for Spark Page and see if you are up to the challenge!
Read More »

Friday, September 25, 2015

Awesome iPad App: Adobe Voice

Storytelling is a powerful way to inspire students and give them a voice. They inspire us, catch our attention, and solidify concepts in our mind. The way stories are created and shared can be just as powerful. Students don't need a tool to be so complicated that it gets in the way of the telling of the story. 

Adobe Voice is an iPad app that follows this philosophy. Check out this two minute video from Adobe Voice that shows this philosophy.
 

Voice is so easy to use that students at virtually any grade level could use it. When you launch Adobe Voice the first time, it includes an on screen tutorial to walk you through the process of creating your story. Once you know what you're doing you can skip that and go straight to the creation!

The app starts by asking you to enter a topic for your story. Swiping up from the bottom reveals suggestions for different types of stories.


Voice then offers a story structure for various kinds of stories. The structure includes a certain number of slides with suggestions for what story element to include on that slide. You can also start from scratch. Make your choice and tap Pick This One.


Choose a Layout for the slide you are on.

Choose a Theme for the entire story.

Choose Music for the entire story.

On each slide you tap the + to add an icon, photo, or text. There are thousands of iconic images to choose from.

If you select photo you can import from the camera, camera roll, or Dropbox.

Tap the microphone and record what you want to say. It's best to add only one or two sentences on a slide. Let the pictures help you tell the story.


When your whole story is done tap the Share icon and save the video to your camera roll.

Adobe Voice maintains a YouTube channel with some really good videos that offer some more advanced tips and tricks.


Integration Ideas

  • Create an All About Me story
  • Summarize a chapter
  • Recount a story
  • Share a biography
  • Create a how-to video
  • Present a position on a topic
  • Cultural explanations
  • Journal of field trip
  • Book trailer
  • Descriptive language practice
  • Create a dictionary

Download the Tech Integration Challenge for Adobe Voice and see if you are up to the challenge!


Read More »

Awesome iPad App: Sock Puppets

Digital storytelling is one of my favorite activities for students to do on the iPad. Letting them do this really brings out their creativity. If done correctly, students can still go through the writing process, learning all those needed skills, and still create a fun product in the end.

Sock Puppets is one of those apps that lets you create digital stories. With it you can create your own puppet shows in seconds. From the Sock Puppets description:
Just add puppets, props, scenery, and backgrounds to start creating. Hit the record button and the puppets will automatically lip-sync to your voice.

Friends can work together and create hilarious conversations with multiple puppets. While recording, simply tap a puppet and that puppet will lip-sync to your voice—all you have to do is tap a different puppet to make them talk back and forth. Switch backgrounds to take your puppets to different places, move the puppets all over the screen and use props and scenery to animate them while recording.
Sock Puppets is only available for iPads. The free version has a limited number of puppets and backgrounds. Projects are also limited to 30 seconds. A “complete” version costs $3.99 and has all the content included and allows for 90 second recordings.

How It Works

Before using the app have students write out their script. This will help the, organize their thoughts and prevent a lot of false starts and stops.

After opening the app tap the New button. Select puppets to appear on the screen. You can select up to four puppets. Tap Next.

 
Select a background. You can select up to 5 backgrounds to use as multiple scenes. Tap Next.


Select up to 4 props to use in your scenes. These will all appear on all backgrounds.  Tap Next.


Arrange the puppets and props and change their size to setup your scene.

Tap the Record button, move your puppets and props, and record your narration. Every time you tap a puppet it will start lip-syncing. You'll see an arrow above it to indicate that puppet is the one talking.


When your show is done, tap the Save button, give it a name, and export it to YouTube or save it to the camera roll.


Integration Ideas

  • Explain a science concept
  • Retell a story
  • Tell about an event from history
  • Share information about a famous person
  • Model appropriate social behavior
  • Tell jokes (Knock-knock jokes work well!)
  • Review vocabulary
  • Have a mini debate
  • ELL conversational skills
  • Foreign language practice

Download the Tech Integration Challenge for Sock Puppets and see if you are up to the challenge!

Read More »

Thursday, May 28, 2015

Awesome iPad App: Book Creator

image courtesy of Red Jumper
One of my favorite iPad apps is Book Creator by Red Jumper. This app is so easy to use that even kindergarteners can create stories with it. Yet it's so powerful that secondary students can use it to publish multimedia ebooks. It can be used in any subject area with any grade level. Publishing for students has never been easier! 

The free version of Book Creator allows you to create only one ebook. Unlimited books comes with an in-app purchase of $4.99. Schools can use Apple Volume Purchasing Program to buy it in large quantities for 50% off. There are iOS and Android versions available.

This short video gives you a quick overview of how easy it is to use.


Launch the app and select New Book.

Choose a book shape (Portrait, Square, Landscape).

The first page is the Cover. All other pages are designed the same way. Tap the + icon to select an item to add. 


Photos - accesses the camera roll for pictures students have saved from the internet or taken with the camera. Also use this option to import videos saved to the camera roll.
Camera - use the camera to take a picture and insert it onto the page.
Pen - can be used to create simple drawings to include on the page.
Add Text - create text boxes that can be moved around on the page.
Add Sound - can be used to import audio from the iTunes library or record student voices. A speaker icon is placed on the page, which, when tapped, plays the audio.

Elements can be resized and placed by dragging the blue dots in the corner.


Format text or layer graphics by tapping the i symbol in the upper right hand corner.


Final projects can be exported as ePub files, which can be viewed in any ebook reader, or PDFs. PDFs lack the interactive element of videos, audio, and page turning.


Integration Ideas


  • In a math classroom students can create a book to compare and contrast different methods of solving problems using text for directions and videos modeling each method.
  • In a primary classroom students can create a number or alphabet book.
  • Students can collaborate on a book with each student responsible for a chapter.
  • In the science classroom students can embed video of an experiment, examine the data, and write out a conclusion.
  • Create a book describing and showing the different types of triangle. Include audio definitions for each type.
  • Create an instructional sequence with each step or task as a chapter.
  • Create an interactive report on an animal or country, including pictures and text.
This blog post by Technology Coach Chris Loat on the Red Jumper website has some really good ideas for using Book Creator in the classroom.

Download the Tech Integration Challenge for Book Creator and see if you are up to the challenge!

Read More »

Tuesday, May 19, 2015

Formative Assessment Toolbox: Poll Everywhere

Poll Everywhere is a formative response system that teachers can use to solicit feedback, ask open ended questions, and generate polls. Students can respond using any cell phone with text messaging capability or via a simple web form on a tablet or computer. Answers are displayed in real time graph form. 

Educators can create unlimited polls for free, but each poll can have only 40 responses. For larger groups, there are fees involved.  Poll responses can be cleared and reused with other classes. Students do not need any app or account. They simply use their text messaging service or a web form to submit responses.

Not sure what a formative assessment tool like this can do for your classroom? Check out these 5 benefits to using Poll Everywhere in the math classroom posted on the Musing Mathematically blog. 

Here is a great walkthrough video on Poll Everywhere called An Educator's Introduction to Poll Everywhere.


How It Works

Go to http://www.polleverywhere.com and create an account.

Click on the My polls link at the top of the page. Click the Create Poll button in the upper left corner.

Type in the question for your poll and select a poll format. You can choose Multiple Choice, Open Ended, Q&A/Brainstorm, or Clickable Image. Formulate your question and possible answers and click Create.


Open Ended questions: the students respond freely to the poll, with anything they wish. Open-ended poll responses can be displayed in a variety of ways, including a live Word Cloud, ticker tape, text wall, and cluster. Teachers can even use Moderation to manage which responses are shown publicly.

Q&A/Brainstorm questions: The students submit responses, and can anonymously agree or disagree with other responses by upvoting or downvoting.

Clickable Image questions: The students click on a specified or unspecified region of an image to vote. Currently this poll only allows web voting, not SMS texting.

Once your poll is created, you’ll be taken to the poll itself where you can configure it further. Options are on the right side.

The How people can respond section shows you the URL students would go to or how to text their answers.


The Response settings section lets you set how many times a student can respond or make responses anonymous. You can also set a custom thank you message after responding.


Polls can be activated in several ways. 

  • Go to the poll page and click the Activate button on the right. 
  • Take the poll full screen and it’s automatically activated.
  • Embed the poll in a PowerPoint or Keynote and it will be activated when arriving on that slide.

Students respond either through the web form or by texting their answer to the designated number.


Integration Ideas


  • Check for understanding after a difficult lesson
  • Do Now! activity when students enter class (ex: What did you do this weekend? How do you feel about the upcoming test?)
  • Make classroom decisions (ex: What should we name our class pet? How much more time do you need on the paper?)
  • Assign as a homework assignment (ex: Answer the poll by midnight)
  • Keep track of student progress (ex: Text “Done” to the poll when you are finished)

More detailed help, including video tutorials, is available in the Poll Everywhere user guide.

Download the Tech Integration Challenge for Poll Everywhere and see if you are up to the challenge!

Read More »

Monday, May 18, 2015

Formative Assessment Toolbox: Kahoot


Kahoot is a free game-based formative response system. The teacher displays the questions on a screen and students answer them through any web browser on any device (tablet, smartphone, laptop). It is highly engaging and provides immediate feedback to students and formative assessment data for teachers.

Kahoot is a free web based app. Teachers and students create accounts at getkahoot.com. There is no mobile app, but it is optimized for mobile devices. Shortcuts can be created on your device’s home screen. Use https://create.kahoot.it/ to create Kahoots, and https://kahoot.it/ to join and play a game.


How It Works


  1. Teachers create a free account at http://www.getkahoot.com.
  2.  Choose which type of Kahoot to create.

  1.  Type in a name for the Kahoot and click Go.

  1.  Type in the question in the Question box. 
  2.  Choose whether to include points and enter a time limit for the question.
  3. Add an image or video. Both are optional.
  4. Enter the answers and click the Incorrect button to toggle on the right answer.
  5. On the Settings tab choose a language, privacy settings, and an audience.  Public means others on the web can find and use your Kahoot.  Private means only you and those you share with, can use the Kahoot.
  6. Add a cover image, (optional).
  7. To launch the Kahoot, click Play next to it. There are a few settings that can be configured at launch.
  8. Students go to http://kahoot.it, enter the Game-pin, create a nickname, and wait for the instructor to start the game.


Integration Ideas


  • Identify images.
  • Vocabulary practice.
  • Reading comprehension - after reading a story or article, assess how much students remembered.
  • Introduce a new concept or topic.
  • Connect with another classroom and use a screen sharing app such as Skype to play a game of Kahoot.
  • Create a poll to survey class interest on a topic.
  • Have students create their own Kahoot account and create a Kahoot for a project they are working on.


Resources

You can find out more about Kahoot by reading the Getting Started Guide or by downloading my Technology Integration Challenge for Kahoot.

Read More »

Sunday, February 15, 2015

Awesome iPad App: PuppetPals

There are many digital storytelling apps for iPads out there. One of my favorites is Puppet Pals 2, which lets students use digital puppets to tell their stories. Students can import their own pictures and backgrounds for unlimited creativity. When students touch a puppet and speak, the character's mouth moves. Students can even move individual limbs and joints on any of the puppets. The creativity with this app is unlimited!

Puppet Pals 2 is a digital storytelling app. Students choose a setting, puppet characters, rides for their puppets and appropriate background music for their story. Once the stage is set, students move the puppets with their fingers while narrating their story. Finished videos can be exported to the camera roll.

Puppet Pals 2 is free from the iTunes App Store. A Full-Access Pass with access to all settings, puppets and rides is available for $9.99. Using Apple's VPP schools can get it for half that price.

Students begin using the app by setting up the stage with a setting and characters. When everything is ready, they press the record button and start narrating their story.

1. Select a location or choose Photos and import their own photo as a background.


2. Select Characters.


3. Select a Ride for their characters.


4. Select appropriate background music.


Create their own custom character by switching heads and bodies. They can even take a picture of themselves and add their head to one of the bodies!

5. After the scene is set up, students tap the record button and begin narrating their story. They can use their fingers to move the puppets or their joints around the scene.

6. Once the recording is done they can preview their video or save it.

7. Finished videos can be exported to the Camera Roll and transferred off the iPad, if desired.

Integration Ideas

  • Students create a cartoon that highlights the major conflict in a work of fiction.  The characters have to use dialogue to explain the major obstacles that are being faced within the story.
  • Create short instructional videos in any learning area.
  • Create natural sounding dialogues to be incorporated into written works.
  • Take snapshots of main character or events in a story, use them to retell or create a new ending.
  • Use student photos or characters to act out story problems.
  • Use the historical characters and photos from the internet to tell a story from history.
  • Create any original short story and act it out using the characters.

Download my Tech Integration Challenge for Puppet Pals 2 and see if you are up to the challenge!
Read More »

Thursday, February 12, 2015

Awesome iPad App: Toontastic

One of my favorite iPad apps is now completely free! Toontastic by Launchpad Toys is a digital storytelling app for iPads. Students use puppets, narration, animation and their imagination to tell a story. Students are guided through a 5 part story arc to develop their story. Final cartoons can be exported to the camera roll or uploaded to the ToonTube website for anyone to view.


Toontastic is available for free from the App Store and includes all the settings and toys from a variety of themes. Finished cartoons can be uploaded to the ToonTube website where can be public or private. Students cannot create accounts. Instead, the teacher would create a class account and all student work would be uploaded to the same location.

Toontastic has a great features that guide students through the steps of building their stories. The task and purpose of each step is explained in easy to understand language, while arrows prompt students to the next step.

Tap Create Cartoon, then New Cartoon.

For each scene in the story arc, begin by tapping the scene, then the Paintbrush.

Select a Setting.

Select Toys (characters) that play a part in that scene.

Tap the Start button and record the story while moving the puppets around the screen with your fingers. There must be narration or you cannot go to the next step.

Add background music to the scene. 

When all scenes are finished, tap the Done button. Give the movie a title and enter the Director’s name. The video will be created and can be exported to the Camera Roll. It's that easy!


Integration Ideas


  • Have students retell a selection from a story read during class.
  • Use the story arc to teach students story development.
  • Have younger students create a simple story with just 3 scenes: beginning, middle, end.
  • Have students recreate a famous scene from American history, such as the signing of the Declaration of Independence.
  • Print out settings and character cards and have the students select characters that normally wouldn’t belong in a setting. Have students create a story explaining what happened.


Resources

I've used Toontastic with several different grade levels. I've developed a few resources that help students create their stories before recording them. These resources are free to download and use as you see fit.

Scenes and Toys - each theme has settings and toys. I've put each theme and all it's toys on it's own page. This makes it easy for students to see all the possiblities for their story elements. It's also useful for rooms where not all students have access to an iPad.

Storyboard Scene - this is a one page planning guide for each scene. Students draw their scene, the characters, and write this part of the story. 

Storyboard BME - this storyboard was designed for my kinder classes that created stories with a Beginning, Middle, and End. Students can plan out their entire story on one page.

Download my Tech Integration Challenge for Toontastic and see if you are up to the challenge!

Read More »