Thursday, December 18, 2014

Adding students in ThingLink: The Nightmare Begins


Today was the third day of working with a 3rd grade class using ThingLink. The first two were a failure because I spent the entire time straightening out student logins. It wasn't until this third session that students could start working on their project and even then there were a few problems. The student management component of ThingLink needs to be rethought.

At first blush, setting up student accounts in ThingLink seems to be straight forward. First you need to make sure you have an education account by logging in through the ThingLink Edu page. After your account is set up you'll have a Students button that takes you to a screen where you can create groups for each of your classes. Within each group you then have the ability to create student accounts or have students with existing ThingLink accounts join your group. This is where the process starts to fall apart and the nightmare I experienced began.

The first choice lets you create student accounts, supposedly without using email addresses. The teacher types in the student names and clicks Register Students. Student accounts are then created using an internal email format which looks like random characters. For 3rd graders it was impossible to remember. All contact info for the students, including password recovery links, are sent to the teacher's email. Passwords are also randomly generated and included a mix of upper and lower case letters - again very difficult to remember. The username and password only appear on the screen one time, so if the teacher doesn't print them out she will not have that information and will need to reset their password manually.

Because it was so difficult for students to type in their username and password we ended up using our entire class period trying to get logged in. I thought a better solution would be to switch student accounts to their local school email address, which luckily our district allows. However, in doing so the teacher then loses control of resetting passwords, since all those requests go to the student email address. Nonetheless, I tried to teach the students to go into their account and change their username to their school address and the password something easier to remember. This took another entire period to accomplish.

Other options for creating student accounts both require students to create their own account first using an existing email address and then use a code to join the class. This works only if the students have an email address and it doesn't offer the teacher any management abilities over passwords.

A much better solution would be a model similar to how Educreations or Edmodo creates student accounts. Students are not required to have email addresses and teachers have some control over username and passwords.

ThingLink is an awesome resource and students were very engaged when we could finally get them logged in. But the company really needs to rethink how student accounts are created and managed or teachers may abandon it out of frustration.

Read More »

Tuesday, December 16, 2014

Formative Assessment Toolbox: Socrative

Formative assessments are a vital tool for any teacher to give feedback to students and/or guide their instruction. They should not be used for grades. In the digital classroom there are many excellent choices, including Socrative.

Socrative is a student response system that runs on tablets, smartphones and the web. Teachers can survey students, ask formative assessment questions, or facilitate an online discussion. Data is live and in real time, providing immediate feedback to the teacher and students that can drive instruction and class discussions.

Socrative is completely free. There is a separate app for teachers to prepare the questions and for students to answer. Apps are free and support up to 50 students logged in at one time. Teachers can also create at t.socrative.com and students participate at m.socrative.com.

There are several reasons a teacher might want to use a digital tool for formative assessments instead of traditional formats. 
  • Its interative and engaging
  • It provides immediate feedback
  • It is paperless
  • It saves time when grading assignments
  • Students can use Socratic on any device, on any platform. 
Check out this quick overview video to get an idea of how Socrative works.


Teacher App

There are four types of questions teachers can ask, all from within the teacher app.

  1. Start Quiz - Tap this button to select a prepared quiz from the list of saved quizzes.
  2. Quick Question - Tap this button and choose Multiple Choice, True/False, or Short Answer. Ask the question out loud and students will respond on their app. Answers will appear in the form of bar graphs. With Short Answer questions you can type the question and have it appear on the students screens and have students include their name with their response. When done, tap the Finish button.
  3. Space Race - Tap this button to create a game style quiz where students compete in teams or against each other. Select a saved quiz for questions and choose the number of teams. As students answer questions correctly the space ship moves across the screen.
  4. Exit Ticket - Tapping this option will send three preset questions to the students: How well did you understand today’s material? What did you learn in today’s class? Answer the teacher’s question.
Tapping the Manage Quizzes button takes you to a screen where you can create, edit, and import quizzes. The Socrative Garden blog has a list of teacher generated quizzes you can import right into your list of quizzes! You can also view and download reports on any type of quiz. 


Student App

When students first log in they enter your room number. They will see a short message as they wait for the quiz to start. As each question appears on their screen they select their answer and tap Submit Answer.

Integration Ideas

  • Use multiple choice question as a likert scale: Do you agree with the main character’s actions? A = strongly disagree, E = strongly agree
  • Use the short answer option to create fill-in-the-blank questions on subject-verb agreement.
  • Include pictures outlining a state’s shape as a states quiz.
  • Have a Space Race against another class within your school? Against another class in the US?
  • Use short answer to ask “Please explain your answer”.
  • Check for understanding of vocabulary by using short answer format to have students create a sentence using the vocabulary word.
Check out http://garden.socrative.com for more creative ways to use Secretive with your class.

More detailed help, including video tutorials, is available in the Socrative Help Center.

Download the Tech Integration Challenge for Socrative and see if you are up to the challenge!


Read More »

Monday, December 15, 2014

App Criteria: Choosing a good iPad app

As a Digital Learning Coach I've been working with several schools as they define what they want to do with iPads. Sadly, most of what I find on their iPads is what I consider to be junk, useless, and educationally inappropriate apps. It seems that previous tech folks, and in many cases, teachers, have simply installed the free app of the day or the latest "Top 20 Apps for Education" without really looking at the app and evaluating what it does. This results in the iPad becoming a toy or babysitter in the classroom.

My philosophy on iPads and apps is based on the SAMR model. I find this model to be very useful in helping to define what I want technology to do. Using the iPad to do something that's just as easily done on paper and pencil doesn't seem like a good use of technology. To me, the iPad should be used for learning tasks that could not easily be done without the iPad. This blog post by Jennie Magiera articulates my thoughts on this very well.

When looking specifically at apps, the SAMR model becomes even more important. Using a commonly found app such as Math vs Zombies as an example, you can see how how this plays out. The app is simple enough: users answer basic math problems in order to kill off the attacking zombies. Students have to solve math, so it's educational, right? Students are learning, right?

The answer is no, they are not learning, for many reasons. The app doesn't track progress for multiple students, the problems are not customized for the student's needs, and there are no math skills actually being taught. This app really only hits the lowest levels of Blooms Taxonomy and the Substitution level of the SAMR model. Math facts could just as easily be learned with a basic set of flash cards.

A much better choice would be to let the flash cards to their job and use the iPad to redefine the learning and the teaching. Use creation apps so students can demonstrate what they are learning and reach that higher level of Bloom's Taxonomy.

What to I consider, then, to be a good app? After thinking about this for awhile, here is my criteria for what I consider to be a good educational app:
  • can be used in multiple content areas
  • can be used in multiple grade levels
  • allows the content/project to be transferred off the iPad, either to a website or through a Dropbox type service
  • can track the work of multiple students, either by saving multiple projects or through student logins
  • engages students at higher levels of Bloom's Taxonomy and the SAMR model
This is just my thoughts on what makes a good app and I've listed in a previous post what I think are awesome apps that fit the above criteria. I'm constantly adding to the list (ThingLink!) as I come across new and exciting tools.

Do you agree or disagree? What do you think makes an app suitable for the classroom?

Read More »

Thursday, December 11, 2014

Edmodo Part 16: Link Your Google Drive

This post is the next in a series of posts to help schools and teachers that I work with get started with Edmodo.

If you use Google Drive you can link it to your Edmodo Library. With this method you can store and organize your files in Google Drive and then share them with your groups. This could save you a lot of time and keep all your resources in one location.


  • Click the Library icon.
  • Select Google Drive.
  • Click the Connect with Google Drive button and you will be prompted to sign in to your Google Drive Account.
  • Select Accept when prompted about Edmodo permission to access your Google Drive. Now you can access your Google Drive files just like you can any other resources in your library.
Students can also link their Google Drive account to Edmodo. Students don't have a Library icon, but instead have a Backpack icon. Otherwise the process is the same.


You can find more detailed instructions on using Google Drive in the Edmodo help files.

Read More »

Tuesday, December 9, 2014

Edmodo Part 15: Library

This post is the next in a series of posts to help schools and teachers that I work with get started with Edmodo.

Your Edmodo Library is like having a Dropbox or Google Drive attached to your Edmodo account. You have unlimited file storage and can upload any type of file or link to any website. With items stored in your Library you can then attach them to any post or assignment or share them with any of your groups.


  1. Click the Library icon on the top toolbar.
  2. You'll see all of the resources saved to your library. You can Filter by file or link and View by icon or list.
  3. To add items to your library simply click Add to Library. You will be prompted to either upload the file or put the URL of a website or resource.
  4. If you have attached your Google Drive you also have access to any files saved there.


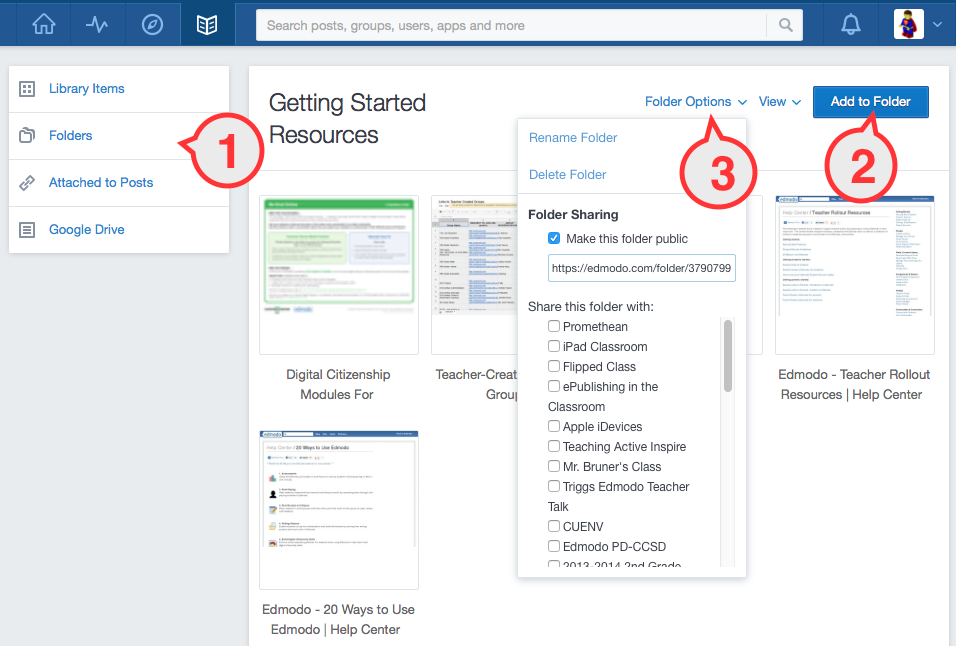
  1. Resources can be organized into any number of folders. Click the Folders tab and then create folders as needed.
  2. Once inside a folder you can click Add to Folder and add resources directly to that folder.
  3. Resources, including entire folders, can be shared with any group by selecting Folder Options and selecting the group(s) in the list. Group members see a Folders icon in their group. Clicking that then shows the shared folders and resources. Shared folders/resources do NOT appear in their Library/Backpack.

You can add single resource items to any post or assignment by clicking the Library icon and selecting the item.

Bookmarklet

Normally you have to be in your Edmodo Library to add resources. Edmodo has created a bookmarklet that makes it easy way to add web content to your Library from any website. Once you have the bookmarklet, you can simply click on it to bring up a sharing screen where you will be able to choose which folders to put the resource in, and whether or not you want this resource to be shared with your Edmodo connections.

Check out this Edmodo blog post to find out how to add the Edmodo Bookmarklet to your browser of choice.

You can find more detailed instructions on using the Library in the Edmodo help files
Read More »

Monday, December 8, 2014

Educreations: adding students

I've talked about Educreations before and I love it for students to demonstrate their learning and understanding of pretty much any concept. Because students must narrate what is happening on screen, it's easy for the teacher to understand what they are thinking.

One of the features I also love about Educreations is the classroom management. Teachers can create multiple classes with any number of students in them. Creating student accounts and enrolling them in your classes is a snap. When a teacher wants to review student projects, its super easy because all of the projects are in one location.

Another advantage to setting up classes is that the teacher can create a video lesson and assign it to the class to watch. This is a great way to deliver content to your students.

Here are the steps of setting up classes using an iPad. The process is similar on the website.

  1. From the lessons screen tap on the My Classes icon.
  2. Tap the + symbol.
  3. Fill in the information about your class and tap Save.


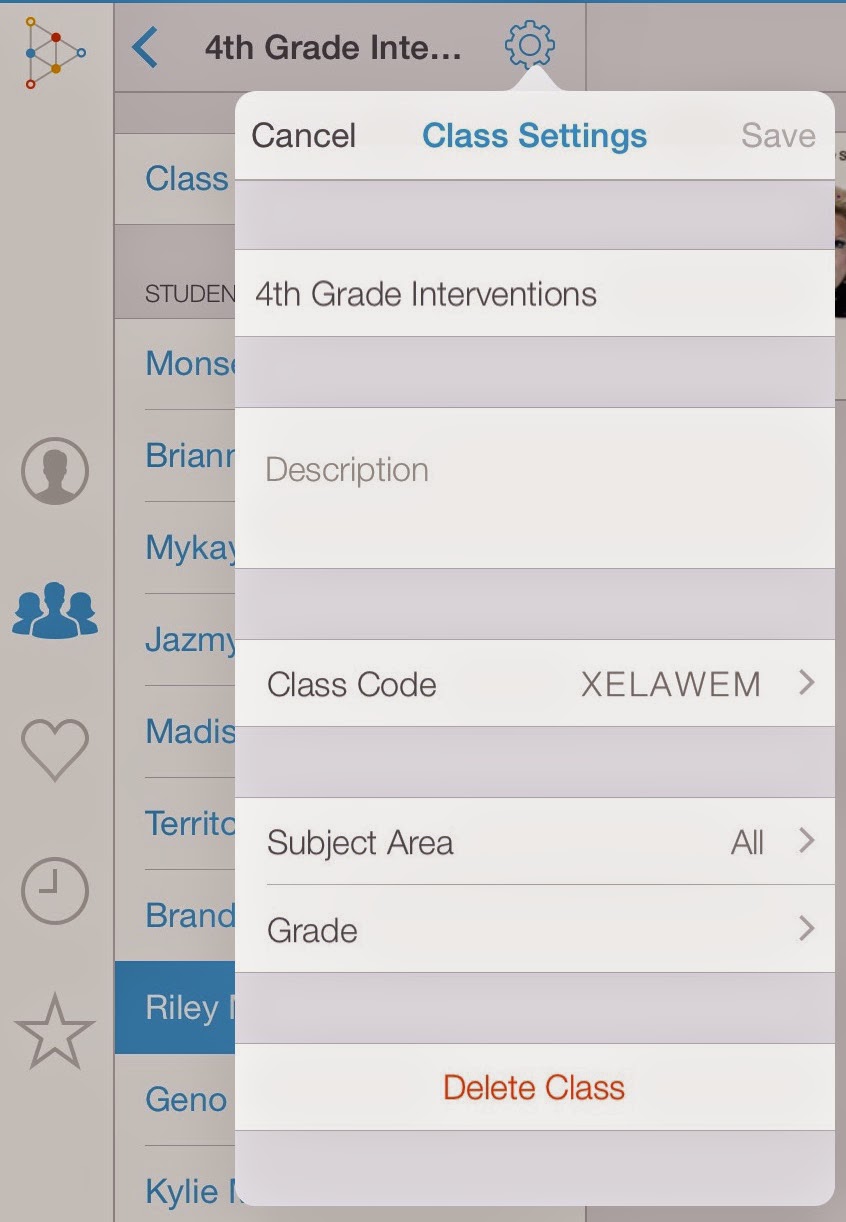
  1. Tap on your class name and you'll see a class code. This is the code students will enter when they create their accounts. They can create their account either by tapping the gear icon or they will be prompted to create an account when they save their first project.
  2. Another advantage to creating classes is that you can assign specific video lessons to that class. In your class screen tap the + button at the top and either create a new lesson or select an already saved lesson. Students will then see this lesson when they log in to their account.


Read More »

Thursday, December 4, 2014

Awesome iPad App: ThingLink

ThingLink is a digital tool that provides users with the ability to turn any image into an interactive masterpiece. Create multiple hot spots on specific parts of the image that launch videos, text, audio, and links to websites. The website and iPad app versions have similar functionality. ThingLinks with full interactivity can be embedded on any web page.

ThingLink is free, either on the web or as an iOS app. When creating your account on the web, teachers should be sure to do so from the ThingLink Edu page. This lets you set up groups and students.

Setting Up Classes and Students

  1. Click the Students button and then create a group.
  2. Click Register Students. Follow the directions carefully to enroll your students. You’ll need to print out the list of usernames (fake email addresses) and passwords. Students can change their email address and password from their own profile after they’ve logged in.
  3. Manage Groups lets you reset passwords and view student usernames.

Creating a ThingLink

  1. Click the Create button.
  2. Upload an image or click Web and paste in the URL. This will be the base image that becomes interactive.
  3. Click anywhere on the image to add a tag or hotspot.


  1. Paste in the URL for any resource: image, video, audio clip, or website.
  2. Enter text as a caption to the multimedia resource or use text as the information that appears in the hotspot.
  3. Change the icon for the tag/hotspot.
  4. Save the tag and reposition it if necessary.
ThingLinks can be shared by Tweeting, linking or embedding on a class blog. You can even embed your ThingLink into Edmodo!

Integration Ideas

  • Use a map as a base image and identify historical places, link to current temperature, local attractions, and regional recipes. 
  • Create a photo collage and add links with descriptive adjectives, synonyms, antonyms, etc.
  • Use a picture of a famous artwork as a base image and add links to information about the artist and their other works.
  • Create an interactive author presentation adding tags to book lists, book trailers, and bibliographies.
  • Music teachers can link to audio recordings of composers, sounds of instruments, vocabulary, and biographies.
  • Assign a ThingLink image to prep for a class discussion.
Find even more inspiration for using ThingLink in your classroom:

Download the Tech Integration Challenge for ThingLink and see if you are up to the challenge!

Read More »

Tuesday, November 25, 2014

Edmodo Part 14: Personalize your avatar

One of the funnest things about having an online social presence is the avatar that goes with your account! Avatars tell a lot about someone's personality. It appears next to your name on every post and gives others a visual clue as to the author of that post.


This post is the next in a series of posts to help schools and teachers that I work with get started with Edmodo.

One of the funnest things about having an online social presence is the avatar that goes with your account! Avatars tell a lot about someone's personality. It appears next to your name on every post and gives others a visual clue as to the author of that post. 

When students and teachers first create their Edmodo account they are given a boring, generic, gray avatar. Luckily there is an easy way to give your avatar some personality.

If you have yet to update your avatar you'll see a message just below it. Click that message.

If you've already modified it and just want to update it, click the small avatar in the upper right corner and click Profile. Hover over the avatar on the left side and click the pencil icon.


  1. Upload a photo or graphic.
  2. Click Personalize Avatar to customize a cartoon doppelgänger.

You can customize the background, shirt, head shape, hair, eyes, and mouth. Click on an element to see other color choices. Once you are happy with your avatar, click Save, then Update.Teachers also have the ability to remove a student's profile picture if you find that it was inappropriate. Directions can be found in the Edmodo help files.


Read More »

Friday, November 21, 2014

Edmodo Part 13: Notifications and Filters

This post is the next in a series of posts to help schools and teachers that I work with get started with Edmodo.

After posting assignments, quizzes and Snapshots to your Edmodo groups, it would be nice to have notifications letting you know about new posts or work that has been turned in. Edmodo has a helpful Notification icon that gives you a visual reminder of recent activity.

A number will appear on the icon indicating how many notifications you have. The types of notifications depend on whether you are signed in as a student or teacher, but generally you will be notified about replies, assignments, quizzes, Snapshots, grades and badges.

  1. Click the Notification icon to see a list of notifications.
  2. Notifications in gray are new, unread notifications.
  3. Notifications in white are previously read. Click on any notification item to go directly to that post or to reply back. 
  4. Click View Categories to view only a certain type of notification.
  5. Hide or dismiss the notification by clicking on the X that appears to the right when you hover over the notification.

You can find more detailed instructions on using Notifications in the Edmodo help files

Read More »

Thursday, November 20, 2014

Edmodo Part 12: Student Backpack

This post is the next in a series of posts to help schools and teachers that I work with get started with Edmodo.

The Edmodo Backpack is a virtual storage space where students can store files and links. These resources can then be accessed from any web connected device. Students can add files and links from their Backpack to any note or assignment. Students have unlimited storage space, although there is a file size limit. Check out this Edmodo help video for a quick overview.

The Backpack is accessed from the backpack icon on the upper navigation bar.

  1. Any resources already added will appear in the main window.
  2. Click Add to Backpack for an upload dialog box (see below).
  3. Folders can be created to group resources.
  4. If students have a Google Drive account, they can connect to their Drive and access all their files and folders stored there.

Upload files

After clicking the Add to Backpack button the upload dialog box appears. Click the Files tab and follow the prompts to upload your file.

Click the Links tab and enter the URL of the website. It will automatically add the title of the website or you can change it to something that makes sense to you.

If you want to add a resource to a post, click the Backpack icon that appears at the bottom of the post.

You can find more detailed instructions on using the Student Backpack in the Edmodo help files
Read More »

Friday, November 7, 2014

Awesome iPad App: Explain Everything

In a previous post I mentioned an easy to use screen casting app called Educreations. Explain Everything takes that concept and adds some powerful tools and features. Explain Everything is powerful yet easy-to-use design, screencasting, and interactive whiteboard tool that lets you annotate, animate, narrate, import, and export almost anything to and from almost anywhere. Create slides, draw in any color, add shapes, add text, and use a laser pointer.


Explain Everything is available from the iTunes app store for $2.99. Discounts are available from Apple’s VPP. No accounts are needed to use the app or share projects.

Explain Everything is a very powerful interactive and screen casting app. It has a lot of features that can make it appear daunting. It has the flexibility to import almost any file type and export in a variety of ways. As such, it’s difficult to provide all of the steps in one short tutorial such as this one. The best way to learn how to use this app is to play with it. The steps presented here are simple steps to give you an overview of what can be done with it.

  1. The tools are down the left side. Tools include pen, shapes, text box, inserting an object (such as a photo/video, browser or sound), laser pointer, object manipulation, zoom, and undo. Long hold on any tool to access settings for that tool
  2. Add and navigate through additional slides.
  3. Audio controls for narrating your project.
  4. Tap the timeline tool to scrub through and edit your timeline.
  5. Export options for saving drafts and exporting pictures and/or video.

Integration Ideas


  • In primary grades have students take a picture of a drawing and explain their work.
  • Record steps in a procedural essay.
  • Have students explain how they grouped or sorted objects.
  • Create a book trailer.
  • Present any information such as a biography on an explorer or report on a planet.
  • Describe the way a bill becomes a law.
  • Students record themselves working through a math problem.
  • Teachers can record any type of lesson for students to view as a blended classroom.
  • Create a digital story.
Download the Tech Integration Challenge for Explain Everything and see if you are up to the challenge!
Read More »

Thursday, November 6, 2014

Awesome iPad App: Creative Book Builder

Creative Book Builder
Creative Book Builder is a powerful app that allows students to create books in epub format, which can then be exported to iBooks or other ebook readers. Students can embed images, audio files, video files, and text to make an interactive book. Books can also include quizzes, tables and QR codes. 

CBB is a paid app through the iTunes app store. It costs $3.99 but is also available at a discount through Apple’s VPP.

Creative Book Builder is a very powerful app for creating interactive ebooks. It has a lot of features that can make it appear daunting. There are also a number of steps needed to make a complete book and publish it. As such, it’s difficult to provide all of the steps in one short tutorial such as this one. The best way to learn how to use this app is to play with it. The steps presented here are simple steps to give you an overview of what can be done with it.

  1. The left pane is for creating the structure of the book. Use the + button to add chapters and other sections.
  2. Tap the Add Element button to add text, media files such as photos, videos and audio recordings, import files from Dropbox and Google Drive, and add text features such as charts, tables and quizzes.
  3. Tap Cover Image to add an image to the cover of your book
  4. Tap Preview at any time to see what the pages will look like.
  5. When the book is done tap Publish to generate the ePub. The finished epub file can be exported to Dropbox, iTunes, or iBooks.

Integration Ideas

  • In a math classroom students can create a book to compare and contrast different methods of solving problems using text for directions and videos modeling each method.
  • In a primary classroom students can create a number or alphabet book.
  • Students can collaborate on a book with each student responsible for a chapter.
  • In the science classroom students can embed video of an experiment, examine the data, and write out a conclusion.
  • Create a book describing and showing the different types of triangle. Include audio definitions for each type.
  • Create an instructional sequence with each step or task as a chapter.
  •  Create an interactive report on an animal or country, including pictures and text.

Download the Tech Integration Challenge for Creative Book Builder and see if you are up to the challenge!
Read More »

Wednesday, November 5, 2014

Awesome iPad App: Popplet

Popplet allows users to visualize and organize ideas into graphic organizers, mind maps, timelines, diagrams and more. Add text, free writing, images, and color to your Popplet canvas. Help students think and learn visually by compiling facts and thoughts and create relationships between them.

A popplet is the entire board that popples live on. A popple is an individual bubble that is part of the popplet. With Popplet Lite you can create only one Poppet.

Popplet Lite is free, but is limited to one popplet. The full version costs $4.99 or discounted through Apple’s VPP. The full version allows you to create unlimited popplets stored on the iPad or online populist which can be shared and edited by other Poppet users.


  1. Tap the gear and select make new popple.
  2. Changes the color of the popple.
  3. Add text. The only formatting options are 3 sizes and justification.
  4. Free draw inside the popple.
  5. Insert an image from the camera, camera roll, or clipboard.
  6. Tap any dot to add another popple in that direction.
  7. Change the background color of the popplet.
  8. Tap Export to save the popplet as a PDF or JPEG. These file types are not editable. Another way to get the popplet off the iPad is to take a screen shot and insert it into another app.

Integration Ideas

  • Use images and text to create a visual biography or presentation of a topic.
  • Create a timeline
  • Use the popplet boxes to divide words into syllables.
  • Practice adjectives (put a picture in the center and students brainstorm adjectives around it)
  • Create a word web
  • Use pictures to show a concept (i.e. ways to make 5)
  • Brainstorming
  • Visualize the structure of a paragraph or essay with main idea and supporting details.
  • Storyboarding
  • Character analysis.
Download the Tech Integration Challenge for Popplet and see if you are up to the challenge!
Read More »

Tuesday, November 4, 2014

Awesome iPad App: Educreations

Educreations is a unique interactive whiteboard and screencasting app. Students and teachers can annotate, animate, and narrate any type of content to teach a concept or demonstrate mastery. As you draw on the screen you record your voice to produce your own video lesson that can be shared with anyone.

Educreations is available for free from the iTunes app store. It is also available as a web app, although that can be a bit harder to use. Teachers can create a class account and assign students their own log in using a class code. Students can then post videos to their own stream, creating a portfolio of learning.

It is important to keep in mind that while recording a project you can start and stop your project at anytime. However, you cannot rewind or edit a recording in progress. Its very helpful to plan out your project ahead of time, in order to minimize potential mistakes.

Launch Educreations and tap the + button to begin.


  1. Tap the pen tool and begin writing on the screen as you explain a concept, just as if you were tutoring a friend.
  2. Tap the + button to add a text box, images from the Camera Roll, internet, Dropbox, Google Drive or Camera. All images can be resized, rotated, or positioned anywhere on the screen.
  3. Tap the Record button to begin narrating. Videos cannot be shared or saved unless they have a recording. You cannot edit the recording. If you mess up, you’ll have to start the project from the beginning. You can pause, start and stop the project at any time.
  4. Tap the arrows to move from page to page (screen to screen).
  5. Tap the share icon to save your draft or save the final draft and upload it to the website.

Teachers can create a class for students to join using a unique code. Students can then log in with their own username and password. Any videos students create will then be saved to their own stream. Teachers can access all student videos.

You have the option of saving videos as private or public. When saving as private, you can email a link to the video for others to watch. When saving as My Students you can provide students and families with a code to register for the site and then view the lessons.

Integration Ideas

  • Construct and describe the setting of a story.
  • Write and perform the inner dialogue of a character in a particular point of a story.
  • Demonstrate the steps of a math problem.
  • Create graphs to differentiate between sets of data.
  • Compare different animals or plants.
  • Using pictures, students can explain the life cycle of an animal, the rock cycle, or the water cycle.
  • When given a picture of a plant, students can identify the parts of a plant.
  • Create a scientific journal, sketching the steps to a science fair project.
Download the Tech Integration Challenge for Educreations and see if you are up to the challenge!

Read More »

Monday, November 3, 2014

Edmodo Part 11: Badges

Edmodo badges are easy ways to provide recognition to individual students for their achievements. Edmodo includes several pre-made badges such as Good Citizen, Hard Worker, and Participant among others. Teachers can create their own custom badges and use those as well.

Badges are not graded. They are simply another way of recognizing students. Think of badges as a way to gamify student learning. Badges can be used as rewards or as a way to let students know they’ve accomplished certain requirements. Teachers can assign badges for any reason.

Creating Badges

  1. Go to https://www.openbadges.me/designer.html to design and create a badge icon. You can use the site to add text and customize the look of your badge. Download the graphic to your computer.
  2. In Edmodo click on the Progress tab at the top of the screen and select My Student Badges. Click the Create Badge button.
  3. Enter a title and description for your badge. Upload the picture you saved in step 1.

Assign Badges

awarding student badges


  1. From the Progress tab at the top of the screen select your class or group. 
  2. Click the Badges tab.
  3. Click the Add a Badge to this Group button and select the badge you want.
  4. When you are ready to award a badge, simply click in the box for that badge and student.

Student View


Students can see badges they’ve been awarded from their profile page. Simply click on the small avatar in the upper right corner and select Profile.

Integration Ideas

Badges can be used to recognize students for any reason. In this presentation from the 2014 EdmodoCon a 7th grade writing teacher uses badges to help his students through the writing process.


Other ways badges can be used:

  • Online Help: award to students who go out of their way to help others on Edmodo.
  • Parent Badge: award to students who’s parents made their Edmodo account.
  • Creative Commons: award to students who understand copyright when using images.
  • Digital Citizenship: award badges to students that complete digital citizenship activities.
  • 25 Posts: award to students that reach 25 useful posts or comments.
  • Writing Process: award to students as they complete each step of the writing process.


Teachers can find more information about badges, including how to share badges with other teachers, at https://support.edmodo.com/home#forums/20805855-badges.

Are you ready to get started with badges? Download the Edmodo Badges Technology Integration Challenge and see what you can do!
Read More »

Sunday, November 2, 2014

Awesome iPad App: Haiku Deck

Haiku Deck is a free presentation app for iPad that puts the fun back into presentations. Haiku Deck is highly visual, relying on high quality graphics for background images and limiting the amount of text displayed on a slide. That is one of the biggest reasons I like it - because of the limited text, students must really know their material when presenting their deck.

Haiku Deck projects are uploaded to their website and can be shared from the web or from the iPad. Because users need an email address to create the account, I recommend teachers in lower grades create a class account that everyone saves to. Haiku Decks can also be created right on their website, so no iPad needed!

Check out this 30 second overview of Haiku Deck.

Launch Haiku Deck and tap the + button to create a new deck. You’ll be prompted to enter a title for your deck. This is a good place to type in your name as the author as well.


  1. Pull down the Theme tab to select a different theme.
  2. Text tab: choose text layout and enter the text for each slide.
  3. Image tab: search for a background image. All images are high quality and creative commons licensed. You can insert your own images or choose to enter a bar or pie graph.
  4. Layout tab: change the layout position of the elements on your slide.
  5. Notes tab: add public notes to include more detail and links to other resources. These are available alongside each slide when shared online.
  6. Slide sorter: add and rearrange more slides.
  7. Preview your presentation
  8. Tag your presentation and share it.

Text tab: choose a layout or list type for your text
Image tab: search for high quality images or choose a type of graph
Layout tab: choose a position and layout for the text
Notes tab: type presentation notes

All decks created on the iPad and online are automatically synced across devices (iPads and web). You can present right from the web or connect your iPad to a projector.

Integration Ideas


  • Tell a story in pictures.
  • Create a sensory poem.
  • Present research information.
  • Illustrate figurative language.
  • Produce a word study using images.
  • Use images to explore the concepts of big and little, etc.
  • Create vocabulary building flash cards on any concept.
  • Do a character study for a book the class is reading.
  • P.E. teachers can demonstrate athletic positions.

Download the Tech Integration Challenge for Haiku Deck and see if you are up to the challenge!

Read More »

Saturday, November 1, 2014

Awesome iPad App: Skitch

Skitch is an app for iPads or desktop that lets you quickly annotate pictures, maps, and webpages using arrows, text, and shapes. Using markup you can focus on what’s important. Annotated images can then be shared out to others or used in other apps. It's a free app available from iTunes or Google Play stores. It can also be downloaded as a desktop app from http://www.evernote.com/skitch

Skitch can be used to mark up a variety of images. The tools across the bottom of the screen allow you to choose pictures, use the iPad camera, capture a web page, map, or PDF. You even have the option to free draw on a blank canvas.

Once you are in your picture, tap the tool icon in the bottom right corner. You have a variety of tools that you can use to annotate. Tap each tool to see it’s options.

Pixelate is used to blur out areas of a picture, such as a face.

The stamp tool allows you to add text to the stamp as well.

Once you have selected your tool, tap anywhere on the screen to start using it.

Tap the color dot in the bottom left corner to select the color and stroke size for text, arrows, and shapes.

The top of the screen also gives you options for cropping and resizing photos as well as a few other editing options.

Once your project is complete you can save it to your camera roll to share with other users or apps. If you want to be able to edit the photo later, be sure to save a copy in Skitch.

Integration Ideas

  • Take pictures around the classroom and identify shapes or angles.
  • Label the parts of an insect, plant, simple machine, or musical instrument.
  • Identify elements of a text.
  • Show important battles from the Civil War on a map.
  • Identify elements or characteristics of a shape or object.
  • Teach foreign language words and concepts by labeling pictures.
  • Students take pictures of their own artwork and label the parts they liked and the parts they would do differently.
  • Use a photo of a scenic area and label it with descriptive words, phrases, or sentences.
Download the Tech Integration Challenge for Skitch and see if you are up to the challenge!
Read More »

Friday, October 31, 2014

Awesome iPad App: Snapguide

Snapguide is a free iOS app that students and teachers can use to create and share step-by-step “how to guides” using photos, videos, and text. Once the guide is created they are posted on the Snapguide website, and can be embedded on class websites or easily shared with a link. Viewers are able to leave comments on each individual page or on the guides in general.

Although Snapguide is primarily used from an iPad, students can also use the website to create guides. There is no Android or Windows version yet. The app is available for free from the App Store.

You will need to use an email to create an account. If your students are too young to have an email address, consider creating a class account.

Check out this simple Snapguide I created in just a few minutes.
Snapguides can be created either on either iPads or on the web. The process is the same either way. Don’t worry about finishing your guide in one sitting. Your guide will automatically saved as a draft until you publish it.

  1. Tap the navigation bar and select the orange Create a Guide button at the bottom.
  2. Add your title and tap the Next button.

This is the main screen where you will create your guide.

  1. Tap the Cover card and add a summary. You can also choose a cover photo.
  2. Tap the Supplies card and enter any supplies needed.
  3. Tap the Add Step button and select your option.
  4. When you select Photo you can take a picture of each step of your project in one sitting. Snapguide will automatically create a card for each step. You can the rearrange the cards, tap to add text, or continue to add more steps. The picture for the title card will automatically be added from the last picture you take of the project.
  5. Tap each card to add text or rearrange them into the order you want. You can even insert text only cards. 
  6. Tap the Choose a Topic button to select at topic. 
  7. When your guide is all done tap the Next button, then Publish.

Integration Ideas

  • Students can document the steps they used to solve a math task.
  • Students can learn about, and share their learning about, procedural writing.
  • Students can create a gallery of their art work.
  • Students can create a digital poetry book.
  • Students can describe the life cycle of a butterfly.
  • P.E. teachers can introduce new skills.
  • Math teachers can show how to solve certain prolems.
  • Science teachers can use guides to prepare students for labs.
Download the Tech Integration Challenge for Snapguide and see if you are up to the challenge!

Read More »

Monday, October 20, 2014

Edmodo Part 10: Go Mobile!

This post is the next in a series of posts to help schools and teachers that I work with get started with Edmodo.

Did you know you can access your Edmodo account from any mobile device? Edmodo's mobile app is a great way to stay on top all your Edmodo work while on the go. They have a version for iOS, Android, and Windows 8. This is great for 1:1 iPad classrooms or shared device environments.


Although the layout is optimized for touch screens, you can still perform all of your important Edmodo tasks right on the device. Teachers can:

  • Create and join Groups
  • Post to Groups
  • Check Notifications
  • Access Libraries
  • Track Progress
  • Set Alerts
  • Create Polls
Students will be able to perform most tasks as well. They can:
  • Post to groups
  • Turn in assignments
  • Take quizzes
  • Take Snapshots
  • Take polls
There are a few limitations for both teachers and students. For example, I could not edit my profile and you cannot award badges through the mobile app. I'm sure more features will be added during future updates.

You can find more detailed instructions about the mobile app in the Edmodo help files.

Read More »