Sunday, October 25, 2015

Google Workflow on the iPad

image courtesy of Flickr
At the Google Mini-Conference on Saturday, video production teacher Shira Park and I presented on Google Workflow for the iPad. With our district jumping on the GAFE bandwagon, many teachers are now knee deep in using Google apps with their students. There are many ways of handling the workflow of passing out assignments and collecting work from the students. We presented a few options that might make this process easier. Teachers can pick what works best in their unique situation.

Our inspiration came from a great post by Catlin Tucker from 2014 called Which Workflow Works for You? I love her ideas. They are straightforward ways for students to share Google documents with the teacher. They help with the organizational setup that can also be used while students are working on iPads. Just a note that gClassFolders that she mentions is no longer supported by the developer.

She mentions using Google Forms and an add on called Doctopus that are not available for iPads. So the initial teacher work would have to be done on a computer, but the students can still utilize those strategies on the iPads. Here is a tutorial I developed for Doctopus.

Since Shira and I were focusing mostly on the workflow on iPads, I'd like to add a few more ideas.

Edmodo and Google Classroom

These are both digital platforms that help with the distribution and collection of student work. Teacher can assign work to students, distributing templates or documents if they want, and students can turn them back in with the click of a button.  They are great methods for gathering the assignments in one location. Teachers can us a built in gradebook to quickly go through the assignments from one screen.


Set a Passcode

In most classrooms iPads are shared between students. Once a student is logged in to their account in Drive, Docs, Sheets, or Slides other students can access their docs. Students can log out when they are done, but that becomes a hassle every time they come to class.

An easier way is to have them log in to the app and then set a passcode. When they do that in one app it applies to all the other apps where they've logged in. Then when the student quits the app and opens it the next time, they have to enter their passcode. Passcodes are easier to remember and enter than an entire username/password. If another student is currently logged in, the student can switch to their own account and enter the passcode. Directions for setting the passcode can be found in Google's Help files.

AirDrop

All of the solutions so far have been specifically for sharing of Google docs. But a lot of the work students do on iPads might be within other apps, such as iMovie, Pic Collage, or other creative apps. These apps save or export files that can be sent directly to the teacher's iPad or Mac using AirDrop. AirDrop is a feature that lets you send files wirelessly to another device.

To use AirDrop follow Apple's steps in this document. Once the files are on the teacher's device, the teacher can open them, move them, or do anything else.

Open in App

Files saved on a device can usually be opened in another app. To use this feature the iPad will need to be updated with the latest OS and that particular app will need to support it. For example, a picture in the camera roll can be saved directly to a folder in Google Drive or uploaded as an assignment in Google Classroom.

Tap the share icon (the icon that looks like a box with an arrow coming out of it). In the list of apps tap either Google Drive or Google Classroom. If you don't see them listed, swipe all the way to the right, tap More, and flip the switch for that app.


If you try to open in Google Drive it will let you navigate to the folder you want. If you try to open in Google Classroom, it will pull up a list of assignments for that user. Choose the correct assignment and it will upload that file as if the student were in Google Classroom.

Read More »

Saturday, October 24, 2015

Let YouTube rock your classroom

Today I joined Karl Gustafson (@lvmachead) to present at the CCSD Google mini-conference at Roy Martin MS. Our topic was using YouTube in the Classroom. Our goal was to share practical ways to use videos to engage students. We also shared ways to find videos and collect them in playlists for easy access

I've embedded the presentation below. The presentation is mostly for resources to use back in the classroom. The workshop itself was a hands on workshop, working through many of the techniques described here.


Read More »

Thursday, October 22, 2015

7 ways to use YouTube in the classroom

YouTube currently has over one billion users, with those users watching over six billion hours of video each month. 300 hours worth of new video is uploaded every minute. It's estimated that the average time spent on a session by mobile YouTube users is 40 minutes. (source) That's a lot of video time! Clearly video is a big thing and isn't going away soon. 

How can teachers harness the power of video? James Sanders has created a presentation 10 Ways to Use YouTube, that has given me a lot of ideas. I've shared some of them here and added a few of my own.


1. Hooks and discussion starters

Start a lesson or discussion with a video that grabs your students' attention. YouTube videos are great for engaging your students, bringing in different perspectives, and encouraging students to consider new viewpoints. This Hot Wheels video could be used to introduce a lesson on the laws of motion or a physics lesson.


2. Critical Thinking

Visual imagery produced by videos is a great way to get students thinking critically. This commercial was produced by Honda to advertise their cars. After viewing it let them play with critical thinking. What's the bigger idea here? What's Honda trying to express about its company? What can the student infer?


3. Exam Review

Use videos to help students review material or study for a test. Create a video with "flash cards" to help students practice vocabulary the night before a big test. Here is one example of using YouTube to review for exams.


4. Flip your classroom

Use video to flip your classroom. Have the students watch a video as homework to understand the basics of a concepts. When they come in to class, expand on their learning experience by applying the information they learned. After watching this video on tectonic plates at home, students could create a model to show movement.


5. Bring the world to your classroom

Bring the world to your students. Many will never have the opportunity to see far away places, experience unique environments or see experiments in action. Use videos during a lesson or unit so students can see what something is actually like, rather than just reading about it.


6. Link videos

Within a video's settings you can add links to other YouTube videos that allow you to create engaging interactive experiences. Here's one that was professionally created.


Here's another one teacher James Sanders put together to help his students learn about chemical reactions. James shows how to do this here.


7. Create interactive videos

Use a service like Edpuzzle or Zaption to create interactive videos. With these services you can embed your voice, add questions, keep students from "skipping" through the video, and gather student viewing data. This is an easy way to hold students accountable for the videos you share with them.


Jim Sill leads many workshops on harnessing the power of video in the classroom. He has compiled a list of creative ways teachers have used videos - everything from cultural bias to risk taking to metaphors. Browse through the list for some very creative ideas. https://sites.google.com/site/mistersillytintheclassroom/footprint/hook-em-playlist

Do you use video in your classroom? What are some ways you can engage students through this medium?
Read More »

Search YouTube like a boss!

With over 300 hours of video uploaded every minute, YouTube is a rich source of video any teacher can use in their classroom. Subtract all the cat videos and you've still got a sizeable chunk of video to sift through to find the perfect one for your class. Luckily, YouTube provides some search filters to help you narrow down those search results.

Playlists and channels are great ways to curate videos and put them in manageable lists. These lists can be shared with students so they aren't overwhelmed by all the choices either. But you still have to populate those playlists and find those channels. Here's an easy way to find the perfect high quality video for your lessons.

After entering your search term in the YouTube search bar, click on the Filter drop down menu. It's located right underneath the search bar. You can choose to see only HD quality videos or those shot in 3D. Searching by Short will help you find videos of the perfect length for your students. Searching by the date will help you find the most current ones.


You can even save yourself a few clicks by including any of those filters in your search terms. For example, add a ", HD" to find only HD videos.


YouTube is the second largest search engine in the world. Using these little tricks, you'll soon be finding your perfect video like a boss!

Read More »

Blogging with Blogger

Blogger is Google’s free blogging platform. It is included with any Google account. Blogs are created at blogger.com and hosted at blogspot.com. Students can use blogs to share thoughts, opinions, keep a digital portfolio, and participate in a variety of writing activities. There are many benefits to having students blog, as I've discussed here and here.

Kidblog is my all time favorite platform for blogging with students. It's easy to set up and offers classroom management features teachers want. As my district has transitioned to Google Apps for Education, teachers are becoming aware of Blogger as a viable blogging platform. This post is to give basic directions for setting up a Blogger blog. You can also download a printable with all of these directions.


Setting It Up

Log in to blogger.com using your Google account and click the New Blog button. Enter a title for your blog, the URL you want to use and select a template. The URL must be unique. The template can be changed later.


From the menu on the left hand side of the window select Template. You can select a different template, see how your blog looks on the web and mobile devices, customize the HTML, and make other visual changes to the look of your blog such as the font, colors, etc.


From the menu on the left select Layout. You can arrange the elements in your template the way you want them displayed. Simply click on the element you'd like to move and drag and drop it where you want it to be. You can move your page elements to the bottom of the page, anywhere in your sidebar, or below or above your blog posts.


Gadgets can add additional functionality to your page. To add a gadget click the Add a Gadget link. In the new window you can select a gadget and customize it. Once you’ve added a gadget you can drag it to where you want it in your layout. Some suggested gadgets are:
  • Labels - if you tag your individual posts with labels
  • Pages - if you add static pages to our blog
  • Link List - Display a collection of your favorite sites, blogs, or web pages for your visitors.
  • Blog List - Show off what you read with a blogroll of your favorite blogs.


Privacy Settings


Privacy and restrictions are handled in two areas, depending on what you want to do. From the menu on the left side select Basic Settings. In the Permissions area you can restrict who has access to see the blog. Add the emails of any students you want to give read rights to.


Click on the Posts and Comments tab. You can allow anonymous comments or force blog readers to login to leave a comment. When you select Comment Moderation you’ll see comments before they are published. A link will appear on your blog dashboard when there are comments to review.


Writing a Post

Click the New Post button. Enter a title for your post (this becomes a link to access the post on your blog). The composer is a WYSIWYG editor, meaning that your blog will appear just as you type and format it. Use the toolbar to format text, insert images and videos, and create hyperlinks.


Click the Preview button to see a full-body preview of the post. Save will save your post as a draft to continue later. Publish will publish it on your blog immediately.

The Post Settings on the right side let you schedule a post, add labels (tags), and a post description.


Managing Student Blogs


Student blogs are independent of each other and Blogger does not provide central classroom management to monitor student blogs and comments. There are ways to gather all the blogs into one location to make it easy for the teacher to see them all at once.

Blogroll

Go to the Layout tab, click Add a Gadget, and add Blog List. Enter the URL for each student blog. This will create a list of blogs in the sidebar of the teacher’s blog. Detailed instructions at here.

RSS Reader

Use an RSS Reader such as Feedly to gather all blog URLs on one page. Posts, but not comments, can be read from this one page. Detailed instructions here.

Blog Authors

Add students as author’s on the teacher’s blog on the Settings>Basic page. Student posts would then be added to only the teacher’s blog. Detailed instructions here.

Read More »

Wednesday, October 21, 2015

Engage your students with a YouTube playlist

image courtesy of Literary Fusions
YouTube has a ton of great videos that can be used in the classroom. Videos can be used to spark discussion, model a concept, hook students, provide real world context, or make lessons more engaging for visual learners. Finding and bookmarking all those great individual videos can be time consuming. Luckily, YouTube has an easy way of curating all those videos into one location.

Playlists are groups of videos curated by you. They provide a convenient way to create groups of videos that you want to refer to during a lesson. You can even share those playlists with students as a resource for them as well.

In order to create playlists you must first be logged in to your YouTube account, which is the same as your Google account.

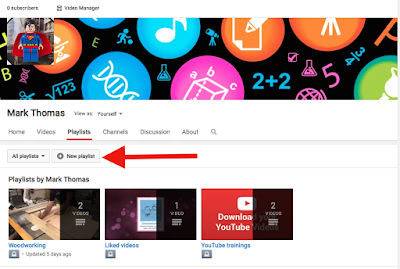
Playlists can be created two ways. The first way is right from your YouTube home screen. Click on the Playlists tab and then click the New Playlist button. Enter a name for your playlist and set it to Public.


When you find a video that you want to keep, click the + button and add it to a playlist. You can also create a new playlist right from this screen.


Finding playlists

Other teachers may have already created playlists full of great content. You can find public playlists searching right in YouTube. In the search bar enter in any topic you are looking for. In the search results click the Filter drop down menu and select Playlists. This will show you only playlists with that search term in the name.


Instead of clicking the drop down and selecting a filter, you can include that filter right in your search by typing a comma and the filter, as shown here. The results also show you how many videos are in that playlist.


You can view individual videos and add them to your own playlists. You may even like the entire playlist and trust the author to curate quality videos. When viewing the playlist just click the +Save button and that playlist will be added to your Playlists in your guide on the left hand side. Every time the author adds another video, you'll automatically see it in your saved playlists.

Videos are a great tool to engage students in content. What are some ways you use video in your classroom?

Read More »

Why you should subscribe to YouTube channels

image courtesy Hypebot
YouTube lets you watch a variety of videos on practically any topic imaginable. Many users produce a whole series of videos on a particular topic. This series of of videos is called a channel. A channel on YouTube is the home page for an account. It shows the public videos that person has uploaded.

Personally I have become interested in woodworking and successfully taught myself how to build a dresser for my daughter. Every time I had a problem I turned to YouTube to see possible solutions and work arounds. In those searches I came across a YouTube channel called The Wood Whisperer that had a lot of great tips. I quickly subscribed to his channel so I could see when he created new videos and catch up on older videos.

As a teacher you might discover channels that interest you and your subject area. Maybe you find someone who produces awesome math videos that are entertaining and explain math concepts in an easy to understand way. Or you teach a foreign language and find a channel that helps students understand basic vocabulary. Subscribing is a great way to save those channels in one place and never miss an new video.

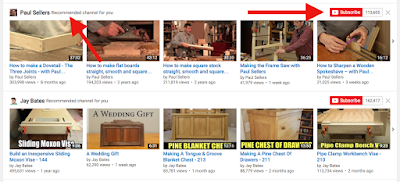
Subscribing to a channel is easy. In order to subscribe, you have to first be logged in to your YouTube account. Then simply click the button anywhere you see it. It's generally found under the video and to the left, near the video's author. The subscribe button also shows you how many people have also subscribed to that channel. The higher the number, the more popular that channel is. When you subscribe to a channel, it's added to your subscriptions list in your guide on the left hand side of your YouTube page.
 

Finding channels to subscribe to

 On your home page you'll find channels recommended to you based on your YouTube browsing history. Since I was looking up woodworking videos, I was recommended a few channels that might interest me. If I like the channel, I can click the button  right there or check out a video first.

Another way to find channels is to search for them. In the YouTube search bar enter in any topic you are looking for. In the search results click the Filter drop down menu and select Channels. This will show you only channels with that search term in the name.


Instead of clicking the drop down and selecting a filter, you can include that filter right in your search by typing a comma and the filter, as shown here.


Keep in mind that these filters only include channels with that search term in their title - not individual videos with that word in the title.

After searching for a channel you can click the  button to subscribe right from the search results.

Subscribing to channels is a great way to follow YouTube authors that you really like. What are some of your favorite channels?

Read More »

Saturday, October 3, 2015

Maker Movement: Bring it on!

image from Mrs. Wideen's blog
The Maker Movement seems to be all the rage in education. I've read about it in my Twitter feed and seen many articles about it in Feedly. I've always been drawn to the philosophy of "learning by doing". It drives my teaching and presenting. I feel that hands on lessons and workshops are far more beneficial than "sit and get". I get the Maker Movement and I'm glad to see it happening!

For the past 4 months I've been on my own little maker movement quest. It all started with my daughter's dresser. The drawers kept falling out of the dresser. I tried repairing it, but it's a cheap particle board, so what really can be done? Being a man I figured I could build one for her with my own hands in a couple of weeks. After all, my dad was a wood worker so it must be in the blood somehow, right?


During the months of February and March I researched and planned. I found a design she liked, but didn't like the assembly method, so I decided to build it using a more "fine furniture" type method. Summer break was coming up and I knew I could dedicate hours on end each day to build the dresser and would have it done in no time. Well, 2 weeks turned in to a month, then two months, then a summer time project, then "It'll be done by next week", and finally "I am determined to finish this by her birthday!"  


I am proud to say that I put in the last screw 15 minutes prior to leaving the house to celebrate her birthday on September 30. My 2 week project was finally done after four months.


Along the way I learned quite a bit. I had no experience designing and building anything more complex than a toolbox for some Cub Scouts - and I had to look that up in the book first! Here's an incomplete list of things I had to learn about as I went through the process.

  • SketchUp software to design the dresser
  • what wood was best for a dresser (I settled on poplar)
  • what joints to use
  • how to assemble the entire thing together
  • all about routers, which I had never used before
  • how to join two boards together to make one wide one
  • the different grits of sandpaper and when to use them
  • how to paint (types of paint, brushes, sanding between layers)
  • how to apply polyurethane

I learned so much during this process. By coincidence I even used some of the math my daughter was learning about in her high school geometry class - and I pointed that out to her.


When the process was finally done, when I put the last bolt in to hold the mirror in place, the feeling of accomplishment and satisfaction was worth it! I had made something! I had spent time and effort and time on something that now stood before me. I had used my brain to solve puzzles, fix problems, analyze, synthesize, and learn how to do from scratch. It was functional, it looked good, and I had made it!

What does this have to do with educational technology? Plenty. This is an example of what I feel technology in education should be used for - for students to create, demonstrate and showing learning. Wouldn't it be great if students could show the same enthusiasm for learning? Have the same feeling of accomplishment? The same experiences of critical thinking and problem solving?

I've seen a disturbing trend in the last few years that has really bothered me. It seems that more and more schools are acquiring technology in order to put students in front of it in the hopes of "closing the achievement gap". Schools purchase programs such as ST Math, Ascend Math, Read 180, Compass Learning, etc and put kids in front of a computer and expect the program to teach them. More and more those students seem to be the ones who are achieving poorly in school and have to suffer through this. We are expecting the computer to do the teaching instead of the teacher.

Most schools I work with have iPads, anywhere from a 1:1 environment to multiple carts to share among classrooms. I've consulted at several schools to help determine apps to use on the iPads. Usually when I look at what's already on the iPads I see a lot of apps with questionable educational value. I don't feel iPads should be used to "entertain" a student with games. I've written about my app selection criteria before and my recommendations boil down to any app that students can use to create with or show their learning.

I welcome the MakerEd movement in education. I hope it gains some serious traction and doesn't become the latest fade that's cast to the side. This is exactly what technology is for. It is to be used as a tool by students where they can create, explore, and show their learning.

I don't want to be asked What can my students play on the iPad?, What are some educational websites where I can send my students?, or Can you teach my students how to make a PowerPoint? Instead, I want to be asked:
  • How can I get my students to write more?
  • How can my students demonstrate <this concept> to me?
  • How can my students explain the process they went through to do X?
  • How can my students share what they've learned?
Bring on the Maker Movement! I'm ready for it! I'm not a master wood worker by any stretch of the imagination. But my daughter can now store her clothes in a dresser that works!


Read More »