Thursday, December 18, 2014

Adding students in ThingLink: The Nightmare Begins


Today was the third day of working with a 3rd grade class using ThingLink. The first two were a failure because I spent the entire time straightening out student logins. It wasn't until this third session that students could start working on their project and even then there were a few problems. The student management component of ThingLink needs to be rethought.

At first blush, setting up student accounts in ThingLink seems to be straight forward. First you need to make sure you have an education account by logging in through the ThingLink Edu page. After your account is set up you'll have a Students button that takes you to a screen where you can create groups for each of your classes. Within each group you then have the ability to create student accounts or have students with existing ThingLink accounts join your group. This is where the process starts to fall apart and the nightmare I experienced began.

The first choice lets you create student accounts, supposedly without using email addresses. The teacher types in the student names and clicks Register Students. Student accounts are then created using an internal email format which looks like random characters. For 3rd graders it was impossible to remember. All contact info for the students, including password recovery links, are sent to the teacher's email. Passwords are also randomly generated and included a mix of upper and lower case letters - again very difficult to remember. The username and password only appear on the screen one time, so if the teacher doesn't print them out she will not have that information and will need to reset their password manually.

Because it was so difficult for students to type in their username and password we ended up using our entire class period trying to get logged in. I thought a better solution would be to switch student accounts to their local school email address, which luckily our district allows. However, in doing so the teacher then loses control of resetting passwords, since all those requests go to the student email address. Nonetheless, I tried to teach the students to go into their account and change their username to their school address and the password something easier to remember. This took another entire period to accomplish.

Other options for creating student accounts both require students to create their own account first using an existing email address and then use a code to join the class. This works only if the students have an email address and it doesn't offer the teacher any management abilities over passwords.

A much better solution would be a model similar to how Educreations or Edmodo creates student accounts. Students are not required to have email addresses and teachers have some control over username and passwords.

ThingLink is an awesome resource and students were very engaged when we could finally get them logged in. But the company really needs to rethink how student accounts are created and managed or teachers may abandon it out of frustration.

Read More »

Tuesday, December 16, 2014

Formative Assessment Toolbox: Socrative

Formative assessments are a vital tool for any teacher to give feedback to students and/or guide their instruction. They should not be used for grades. In the digital classroom there are many excellent choices, including Socrative.

Socrative is a student response system that runs on tablets, smartphones and the web. Teachers can survey students, ask formative assessment questions, or facilitate an online discussion. Data is live and in real time, providing immediate feedback to the teacher and students that can drive instruction and class discussions.

Socrative is completely free. There is a separate app for teachers to prepare the questions and for students to answer. Apps are free and support up to 50 students logged in at one time. Teachers can also create at t.socrative.com and students participate at m.socrative.com.

There are several reasons a teacher might want to use a digital tool for formative assessments instead of traditional formats. 
  • Its interative and engaging
  • It provides immediate feedback
  • It is paperless
  • It saves time when grading assignments
  • Students can use Socratic on any device, on any platform. 
Check out this quick overview video to get an idea of how Socrative works.


Teacher App

There are four types of questions teachers can ask, all from within the teacher app.

  1. Start Quiz - Tap this button to select a prepared quiz from the list of saved quizzes.
  2. Quick Question - Tap this button and choose Multiple Choice, True/False, or Short Answer. Ask the question out loud and students will respond on their app. Answers will appear in the form of bar graphs. With Short Answer questions you can type the question and have it appear on the students screens and have students include their name with their response. When done, tap the Finish button.
  3. Space Race - Tap this button to create a game style quiz where students compete in teams or against each other. Select a saved quiz for questions and choose the number of teams. As students answer questions correctly the space ship moves across the screen.
  4. Exit Ticket - Tapping this option will send three preset questions to the students: How well did you understand today’s material? What did you learn in today’s class? Answer the teacher’s question.
Tapping the Manage Quizzes button takes you to a screen where you can create, edit, and import quizzes. The Socrative Garden blog has a list of teacher generated quizzes you can import right into your list of quizzes! You can also view and download reports on any type of quiz. 


Student App

When students first log in they enter your room number. They will see a short message as they wait for the quiz to start. As each question appears on their screen they select their answer and tap Submit Answer.

Integration Ideas

  • Use multiple choice question as a likert scale: Do you agree with the main character’s actions? A = strongly disagree, E = strongly agree
  • Use the short answer option to create fill-in-the-blank questions on subject-verb agreement.
  • Include pictures outlining a state’s shape as a states quiz.
  • Have a Space Race against another class within your school? Against another class in the US?
  • Use short answer to ask “Please explain your answer”.
  • Check for understanding of vocabulary by using short answer format to have students create a sentence using the vocabulary word.
Check out http://garden.socrative.com for more creative ways to use Secretive with your class.

More detailed help, including video tutorials, is available in the Socrative Help Center.

Download the Tech Integration Challenge for Socrative and see if you are up to the challenge!


Read More »

Monday, December 15, 2014

App Criteria: Choosing a good iPad app

As a Digital Learning Coach I've been working with several schools as they define what they want to do with iPads. Sadly, most of what I find on their iPads is what I consider to be junk, useless, and educationally inappropriate apps. It seems that previous tech folks, and in many cases, teachers, have simply installed the free app of the day or the latest "Top 20 Apps for Education" without really looking at the app and evaluating what it does. This results in the iPad becoming a toy or babysitter in the classroom.

My philosophy on iPads and apps is based on the SAMR model. I find this model to be very useful in helping to define what I want technology to do. Using the iPad to do something that's just as easily done on paper and pencil doesn't seem like a good use of technology. To me, the iPad should be used for learning tasks that could not easily be done without the iPad. This blog post by Jennie Magiera articulates my thoughts on this very well.

When looking specifically at apps, the SAMR model becomes even more important. Using a commonly found app such as Math vs Zombies as an example, you can see how how this plays out. The app is simple enough: users answer basic math problems in order to kill off the attacking zombies. Students have to solve math, so it's educational, right? Students are learning, right?

The answer is no, they are not learning, for many reasons. The app doesn't track progress for multiple students, the problems are not customized for the student's needs, and there are no math skills actually being taught. This app really only hits the lowest levels of Blooms Taxonomy and the Substitution level of the SAMR model. Math facts could just as easily be learned with a basic set of flash cards.

A much better choice would be to let the flash cards to their job and use the iPad to redefine the learning and the teaching. Use creation apps so students can demonstrate what they are learning and reach that higher level of Bloom's Taxonomy.

What to I consider, then, to be a good app? After thinking about this for awhile, here is my criteria for what I consider to be a good educational app:
  • can be used in multiple content areas
  • can be used in multiple grade levels
  • allows the content/project to be transferred off the iPad, either to a website or through a Dropbox type service
  • can track the work of multiple students, either by saving multiple projects or through student logins
  • engages students at higher levels of Bloom's Taxonomy and the SAMR model
This is just my thoughts on what makes a good app and I've listed in a previous post what I think are awesome apps that fit the above criteria. I'm constantly adding to the list (ThingLink!) as I come across new and exciting tools.

Do you agree or disagree? What do you think makes an app suitable for the classroom?

Read More »

Thursday, December 11, 2014

Edmodo Part 16: Link Your Google Drive

This post is the next in a series of posts to help schools and teachers that I work with get started with Edmodo.

If you use Google Drive you can link it to your Edmodo Library. With this method you can store and organize your files in Google Drive and then share them with your groups. This could save you a lot of time and keep all your resources in one location.


  • Click the Library icon.
  • Select Google Drive.
  • Click the Connect with Google Drive button and you will be prompted to sign in to your Google Drive Account.
  • Select Accept when prompted about Edmodo permission to access your Google Drive. Now you can access your Google Drive files just like you can any other resources in your library.
Students can also link their Google Drive account to Edmodo. Students don't have a Library icon, but instead have a Backpack icon. Otherwise the process is the same.


You can find more detailed instructions on using Google Drive in the Edmodo help files.

Read More »

Tuesday, December 9, 2014

Edmodo Part 15: Library

This post is the next in a series of posts to help schools and teachers that I work with get started with Edmodo.

Your Edmodo Library is like having a Dropbox or Google Drive attached to your Edmodo account. You have unlimited file storage and can upload any type of file or link to any website. With items stored in your Library you can then attach them to any post or assignment or share them with any of your groups.


  1. Click the Library icon on the top toolbar.
  2. You'll see all of the resources saved to your library. You can Filter by file or link and View by icon or list.
  3. To add items to your library simply click Add to Library. You will be prompted to either upload the file or put the URL of a website or resource.
  4. If you have attached your Google Drive you also have access to any files saved there.


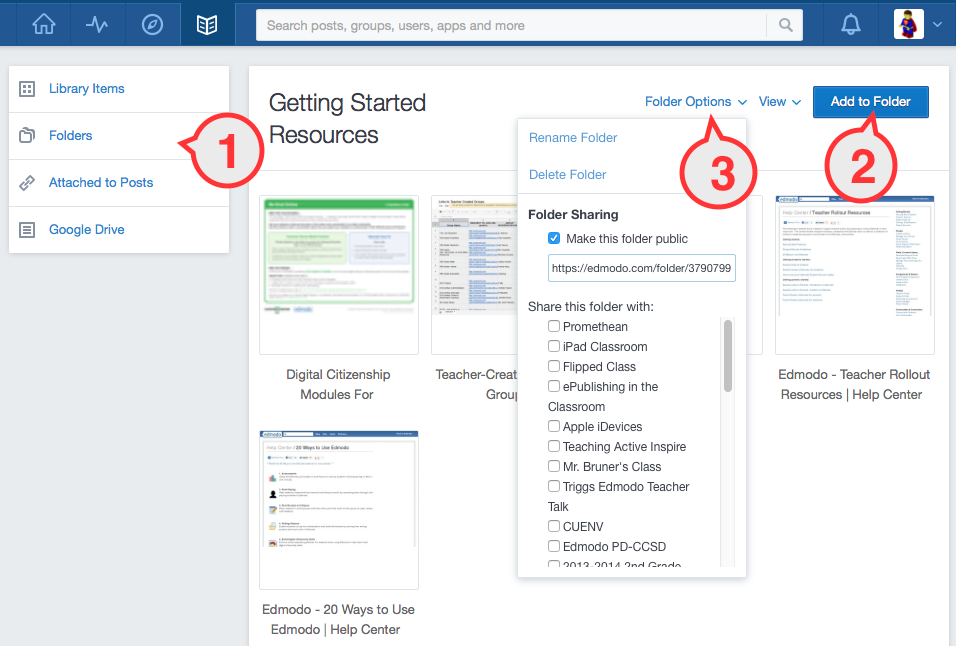
  1. Resources can be organized into any number of folders. Click the Folders tab and then create folders as needed.
  2. Once inside a folder you can click Add to Folder and add resources directly to that folder.
  3. Resources, including entire folders, can be shared with any group by selecting Folder Options and selecting the group(s) in the list. Group members see a Folders icon in their group. Clicking that then shows the shared folders and resources. Shared folders/resources do NOT appear in their Library/Backpack.

You can add single resource items to any post or assignment by clicking the Library icon and selecting the item.

Bookmarklet

Normally you have to be in your Edmodo Library to add resources. Edmodo has created a bookmarklet that makes it easy way to add web content to your Library from any website. Once you have the bookmarklet, you can simply click on it to bring up a sharing screen where you will be able to choose which folders to put the resource in, and whether or not you want this resource to be shared with your Edmodo connections.

Check out this Edmodo blog post to find out how to add the Edmodo Bookmarklet to your browser of choice.

You can find more detailed instructions on using the Library in the Edmodo help files
Read More »

Monday, December 8, 2014

Educreations: adding students

I've talked about Educreations before and I love it for students to demonstrate their learning and understanding of pretty much any concept. Because students must narrate what is happening on screen, it's easy for the teacher to understand what they are thinking.

One of the features I also love about Educreations is the classroom management. Teachers can create multiple classes with any number of students in them. Creating student accounts and enrolling them in your classes is a snap. When a teacher wants to review student projects, its super easy because all of the projects are in one location.

Another advantage to setting up classes is that the teacher can create a video lesson and assign it to the class to watch. This is a great way to deliver content to your students.

Here are the steps of setting up classes using an iPad. The process is similar on the website.

  1. From the lessons screen tap on the My Classes icon.
  2. Tap the + symbol.
  3. Fill in the information about your class and tap Save.


  1. Tap on your class name and you'll see a class code. This is the code students will enter when they create their accounts. They can create their account either by tapping the gear icon or they will be prompted to create an account when they save their first project.
  2. Another advantage to creating classes is that you can assign specific video lessons to that class. In your class screen tap the + button at the top and either create a new lesson or select an already saved lesson. Students will then see this lesson when they log in to their account.


Read More »

Thursday, December 4, 2014

Awesome iPad App: ThingLink

ThingLink is a digital tool that provides users with the ability to turn any image into an interactive masterpiece. Create multiple hot spots on specific parts of the image that launch videos, text, audio, and links to websites. The website and iPad app versions have similar functionality. ThingLinks with full interactivity can be embedded on any web page.

ThingLink is free, either on the web or as an iOS app. When creating your account on the web, teachers should be sure to do so from the ThingLink Edu page. This lets you set up groups and students.

Setting Up Classes and Students

  1. Click the Students button and then create a group.
  2. Click Register Students. Follow the directions carefully to enroll your students. You’ll need to print out the list of usernames (fake email addresses) and passwords. Students can change their email address and password from their own profile after they’ve logged in.
  3. Manage Groups lets you reset passwords and view student usernames.

Creating a ThingLink

  1. Click the Create button.
  2. Upload an image or click Web and paste in the URL. This will be the base image that becomes interactive.
  3. Click anywhere on the image to add a tag or hotspot.


  1. Paste in the URL for any resource: image, video, audio clip, or website.
  2. Enter text as a caption to the multimedia resource or use text as the information that appears in the hotspot.
  3. Change the icon for the tag/hotspot.
  4. Save the tag and reposition it if necessary.
ThingLinks can be shared by Tweeting, linking or embedding on a class blog. You can even embed your ThingLink into Edmodo!

Integration Ideas

  • Use a map as a base image and identify historical places, link to current temperature, local attractions, and regional recipes. 
  • Create a photo collage and add links with descriptive adjectives, synonyms, antonyms, etc.
  • Use a picture of a famous artwork as a base image and add links to information about the artist and their other works.
  • Create an interactive author presentation adding tags to book lists, book trailers, and bibliographies.
  • Music teachers can link to audio recordings of composers, sounds of instruments, vocabulary, and biographies.
  • Assign a ThingLink image to prep for a class discussion.
Find even more inspiration for using ThingLink in your classroom:

Download the Tech Integration Challenge for ThingLink and see if you are up to the challenge!

Read More »