Wednesday, September 10, 2014

Edmodo Part 4: Polls

This post is the next in a series of posts to help schools and teachers that I work with get started with Edmodo.

In previous posts in this series on Edmodo, I showed how to use assignments and quizzes to assess student work. Polls are another effective way of gathering immediate feedback and assessing background knowledge. Polls are anonymous and students can select only one answer. Polls are just as easy to create as assignments and quizzes too!

Post a Poll


  1. Type the poll question.
  2. Enter possible answers. Click the Add Answer button if you need more options.
  3. Enter the group name and schedule the poll, if desired.
  4. Click the Send button.

Student View


When you post a poll it will appear in the student's Edmodo feed.
The student simply selects their choice and clicks the Vote button.

View Results

Locate the poll post and view the results. You can see how many students have participated and can refresh the results if you are viewing the results in real time. You can also Reply to leave a note for your students about the poll or it's results.

You can find more detailed instructions on polls in the Edmodo help files. 

Technology Integration Challenge


In the last three posts you've learned about different assessments using Edmodo. Download this Technology Integration Challenge and see what you can do!
Read More »

Tuesday, September 9, 2014

Edmodo Part 3: Quizzes

This post is the next in a series of posts to help schools and teachers that I work with get started with Edmodo.

In the previous post in this series on Edmodo I explained how to post assignments that can be graded and used for assessments. Another type of assessment Edmodo supports are quizzes. Quizzes are just as easy to create as assignments, but are excellent ways of assessing mastery of lessons. Quizzes can be multiple choice, true/false, short answer, fill in the blank, or matching. These directions will walk you through creating a quiz and posting it to your group.

Select the Quiz tab and click the Create a Quiz button.


  1. Create a title for your quiz.
  2. Click the Add First Question button.


  1. Select a question type and type the first question.
  2. Fill in the answers and mark the correct one.
  3. Click the + button to add more questions.
  4. Decide if you'd like randomize the questions for each student. Show Results lets students see their results immediately after completing the quiz.
  5. Click Assign Quiz. 


  1. Select a due date and check if you want it added to your Edmodo grade book.
  2. Enter a group to post to, schedule it if you want, and click Send.
When students log in to their Edmodo account, they then see a Quiz post and click the Take Quiz button. Once they quiz is completed they add a reaction and click Submit.

Grading Quizzes

After students complete the quiz, go to the Quiz post and you'll see a Turned In button. This will take you to a Quiz Overview page. Multiple choice and true/false quizzes will already be graded and entered into the Edmodo grade book. You can click on a student's name to grade short answer questions and to leave comments on any student's quiz.

You can find more detailed instructions on quizzes, including sharing and printing, in the Edmodo help files. 

Are you ready to try out Edmodo quizzes? Download the Edmodo Quiz Technology Integration Challenge and see what you can do!
Read More »

Monday, September 8, 2014

Edmodo Part 2: Assignments

This post is the next in a series of posts to help schools and teachers that I work with get started with Edmodo.

In my previous Edmodo post, Edmodo Part 1: Getting Started, I briefly described how to post a note to your groups. Posting notes is the easiest way to get the discussion going within your virtual classroom. With the ability to attach files or website links, a teacher can easily share resources, such as classroom notes or blended learning videos, directly to  members of the group.

Notes are great for discussions or collaborations, but let's face it, teachers need to be able to grade student work as well. Posting quizzes and assignments, complete with resources and due dates, are some of the other things you can post to Edmodo. These become part of student calendars and grade books. I'll address quizzes in the next blog post and focus on assignments here.

The biggest difference between notes and assignments is that notes are used for communication and collaboration. There is no accountability other than the teacher manually tracking who has contributed to a discussion. Assignments, on the other hand, are used for grading because they can have due dates and also appear in the Edmodo grade book automatically. Follow the steps below to create an assignment.

Post Assignments

  1. In your Edmodo feed click the Assignments tab.
  2. Type in a name for the assignment and then type the actual assignment.
  3. Select a due date. These dates appear in the student's Edmodo calendar.
  4. Type in the group name.
  5. Similar to notes, you can attach a file, hyperlink, or item from your Edmodo library. You can also schedule when the assignment will appear.
  6. Click Send. 

Student View

When you post an assignment it will appear in the student's Edmodo feed.
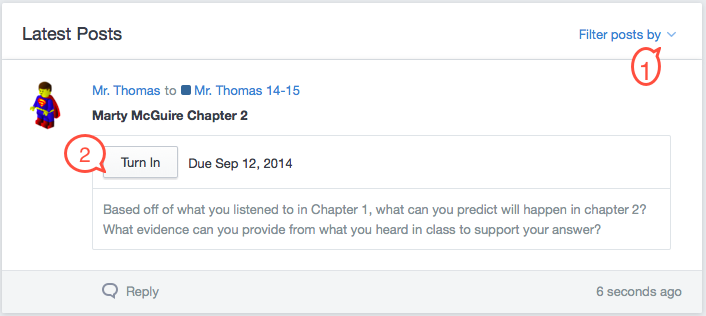
 If they have a lot of posts in their feed they can use the Filter posts by menu to select Assignments. The student clicks the Turn In button and follows these steps to turn in their assignment.

  1. Type a message in the text box.
  2. Select a reaction to the Assignment.
  3. Attach any files, links, or items from the student's Backpack.
  4. Additional comments are optional.
  5. Click on “Turn in Assignment."

Grading Assignments

After students have submitted assignments it's easy for a teacher to view and grade them. Locate the assignment post and click the Turned In button.
  1. Select the student from the list.
  2. Enter a score.
  3. Select a reaction.
  4. Enter a comment about the submission or attach a file (optional).
  5. Click Grade.
Teachers can find more information about assignments, including edit, deleting, and sharing, and reusing assignments at https://support.edmodo.com/home#forums/20796115-assignments.

Are you ready to try out Edmodo assessments? Download the Edmodo Assessments Technology Integration Challenge and see what you can do!

Read More »

Friday, September 5, 2014

Teaching above the line: SAMR

I have been helping teachers integrate technology into their curriculum for the last 12 years, first as an Educational Computing Strategist and now as a Digital Learning Coach. In all those years I have frequently been asked how to integrate technology with this lesson or that theme. Even within the last several weeks I have been asked to come up with a technology rich lesson based on selected standards from the Common Core. Many times it seems we are trying to force technology into a lesson where it is not the best tool. We are trying to use technology for the sake of using technology.

I believe that we need to rethink this approach and use technology when it can significantly change what we are doing. Dr. Ruben Puentedura created the SAMR model to help teachers integrate technology better into teaching and learning. The idea behind using technology is not just do the same old thing, but with a technology twist. The purpose of introducing technology is to enhance or redefine the teaching and learning in ways that are not possible with analog tools.
Image the creation of Dr. Ruben Puentedura, Ph.D. http://www.hippasus.com/rrpweblog/

As an example of applying this model to a typical classroom assignment, picture a teacher giving the assignment for students to write an essay responding to a piece of art, music, or poetry.

At Substitution the students would use a word processor to write the essay instead of paper and pencil. They are simply substituting one tool for another. There is no functional difference and it wouldn't affect the outcome of the assignment one way or another.

With Augmentation the technology allows the students to add hyperlinks, graphics, significantly change the layout, etc. They can do more with the essay than they typically could with paper and pencil.

At the Modification level the technology allows for a significant redesign of the assignment. Rather than just writing a static essay, students can share their writing using a blog so that students can receive feedback from multiple peers in order to make edit cycles richer.

The Redefinition level allows for the creation of new tasks. Instead of writing a response essay, students convey deep analytic thought using visual and text rich creations such as a video production.

This model meshes with my vision of technology in the classroom. I don't believe we should be shoe-horning technology into a lesson just for the sake of using technology. If it doesn't change the way teachers are teaching and the students are learning, then it may not be the best tool for the job.

I realize that teachers need to start using technology somewhere, and maybe that is by using a word processor. But teachers can't stop there and call it technology integration. Teachers need to teach above the line - use technology to teach and learn in ways that otherwise could never happen!
Read More »

Thursday, September 4, 2014

Cool and useful website: printfriendly.com

I have seen many printers in schools with stacks of paper students have printed from various websites. Most of these printouts have ads, pictures, and navigation text that wastes paper and toner. Now there is a website that you can use to strip out that extra stuff from webpages and print just the important text. That website is http://www.printfriendly.com.

To use it you just have to copy the URL of the page you want and paste into the Print Friendly box at http://www.printfriendly.com. It will bring up a preview of the page where you can remove other elements you don't want, such as text, navigation, and images. You can then save the page as a PDF or print it. There is even a browser button you can install so that it's always available!

Don't forget that this website is completely FREE!

Here is a video from their site that explains how it works.


Read More »

Wednesday, September 3, 2014

Digital Learning Coach

Schools in the Clark County School District are transitioning to a new technology support model. The transition began during the 2013-2014 school year and continues with a new set of schools added to the model for this year. What is this new technology support model? And, more importantly, what is the role of the Digital Learning Coach?

The model is broken down into 3 distinct roles.

School Based Technology Team

The Site Based Technology Team is made up of teachers at the school. The tech team at each school helps their peers by providing the immediate assistance for questions and problems related to technology. They develop the site technology plan and assist with staff development. They can identify technology needs that can be better addressed by the Site Based Technicians or Digital Learning Coaches. Some funding is available through the district to compensate the tech team members for after school work.

Site Based Technician (SBT)

The SBTs are responsible for maintaining the hardware and software. If something is broken or otherwise does not work, the SBT is the first point of contact. If they cannot fix it then they can call in work orders for district level technicians.

Digital Learning Coach (DLC)

While SBTs are the "fix it" people, the DLCs are the "how do I use it" people. DLCs provide specialized instructional support for teachers in the integration of technology into the classroom. This support includes assisting teachers in using technology tools and resources to support instruction based on the Nevada Academic Content Standards (NVACS) and appropriate course syllabi; working collaboratively with classroom teachers, instructional specialists, and instructional coaches to implement blended learning opportunities for students; and modeling best practices for using instructional technology to support student learning.

As a DLC I can meet a teacher at whatever technology skill level you feel comfortable with. Some teachers might want to learn how to create folders on the computer or manage their email. Perhaps you would like to use PowerPoint more with your class or want to become more proficient with your SMART or Promethean board. I can even help with more complex technology needs such as flipping your classroom, making global connections, or becoming a paperless classroom.

It may be hard to think about what I can do for you as a DLC. When you go to a restaurant you start out small (the appetizers) and build yourself up to the good stuff (the desserts). I've developed a restaurant style menu with some ideas to get you started. You can download the PDF version as well.

Appetizers

Try one of these small digital appetizers and get a taste of what the digital world has to offer.
  • Troubleshooting 101
  • Beginning Interactive Whiteboards
  • iPad/iPod Touch
  • Using the Cloud
  • Mac/Windows
  • Beginning Digital Organization
  • Office (Word, PowerPoint, Excel)
  • iWork (Pages, Keynote, Numbers)
  • Google Docs
  • Specific apps (iMovie, Garageband, etc.)

Entrees

Fill up on these digital practices to engage your students in their learning.
  • Student/teacher blogging
  • Advanced Interactive Whiteboards
  • Edmodo
  • Digital Citizenship
  • Advanced Digital Organization
  • Skype
  • Learning Management Systems (Canvas, Compass, etc.)
  • Podcasting
  • Video Making
  • Digital Publishing
  • Global Collaborations
  • Skype/Google Hangouts

Desserts

Transform your classroom, indulge your 21st century cravings, and satisfy your student’s desire for learning.
  • Flipping the Classroom 
  • Paperless Classroom
  • Augmented Reality
  • BYOD (Bring Your Own Device)
  • Digital Portfolios
  • Blended Learning

These are just some simple ideas of what I can do as a Digital Learning Coach. There is no tech idea too big or too small! Share other ideas or suggestions you might have in the comments below.
Read More »

Tuesday, September 2, 2014

Edmodo Part 1: Getting started

This is the first in a  series of posts to help schools and teachers that I work with get started with Edmodo.

Edmodo is a free online learning platform that takes the ideas of a social network and refines them for classroom use. Using Edmodo, students and teachers can connect with each other to share ideas and collaborate. Teachers can assign and grade work. Students can respond to prompts, quizzes, and polls. Ideas can be shared in a safe, bully free environment. Edmodo can be used with virtually any grade level. This post will help you get started using Edmodo with your class. This 5 minute video is an over view of Edmodo.

Sign up

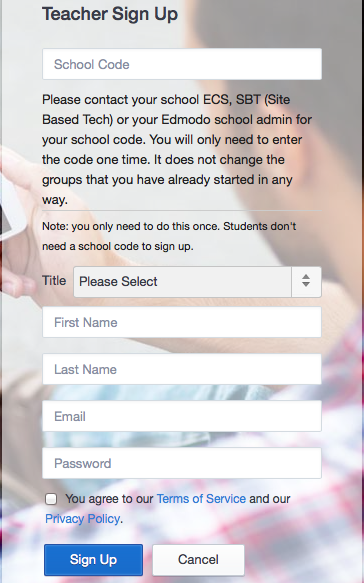
The first thing you'll need to do is create your Edmodo account. CCSD teachers should go to http://ccsd.edmodo.com. Click the I'm a Teacher button and fill in the necessary information. You'll have to get the school code from the Edmodo admin at your site.
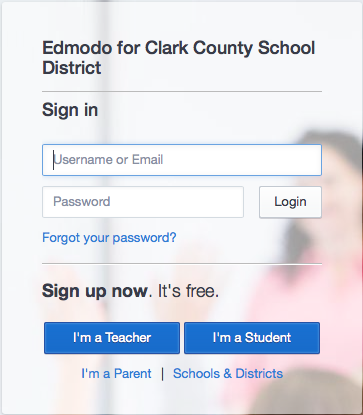
sign in screen
teacher account creation 

Edit your profile

Once you have created your account you can customize your profile. Click on the Account icon in the upper right hand corner and select Profile. When you hover your mouse over the different profile area a pencil will appear. Clicking that will allow you to edit your profile picture and information.
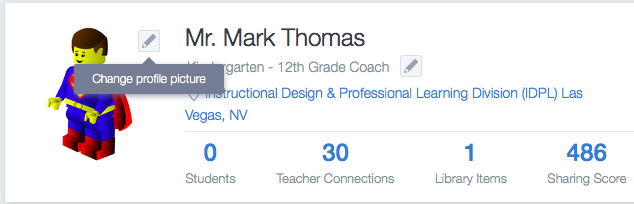
edit your profile

Create a group

Before your students can use Edmodo you will need to create a group. You could create a single group for your class or one for each period. On your Edmodo home page find the Groups section on the left side, click the plus sign and select Create.
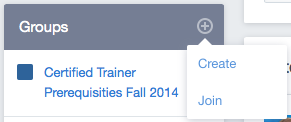
create a group
Type in a name for your group, select the grade level, and choose a subject. Click next and select a group size. Your group is now created and you'll be taken to the group's home page.
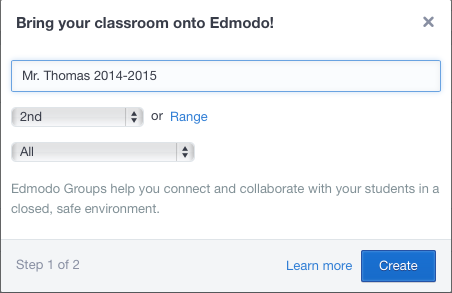
name your group
Click the gear icon next to the group name and select Group Settings. You can change information about the group and select options to have it read only or moderate the posts. When you choose moderate you will receive an email every time a student creates a post or a reply. You must then approve the post or reply before it will appear in the group message stream.
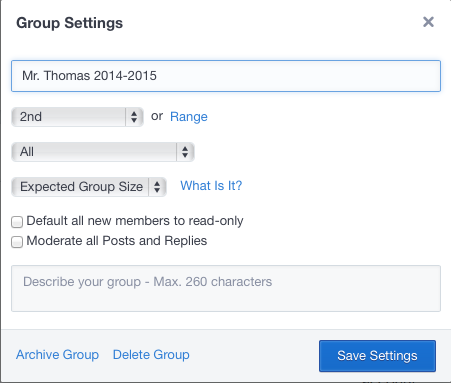
group settings

Sign up students

Right below the group name is the group code. Make a note of this code. Students will need to enter it when they create their accounts. Depending on the age of your students this could be done in the computer lab, as a center, or, for younger grades, with the help of an older student or parent helper.

At the Emodo login screen have the students click the I'm a Student button. Students fill in the necessary information and enter in your group code. It's not necessary for students to enter an email address. Have students use their student number for their username and a password that they can easily remember. As the teacher you have the ability to assign or reset a password if they forget it.
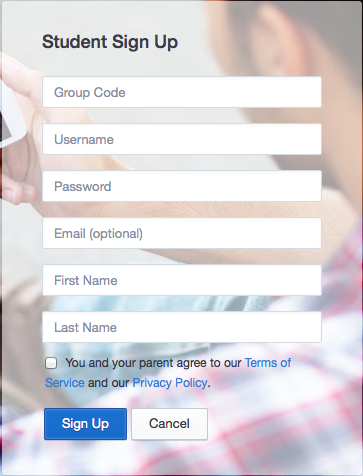
group setup

Basics of posting

Posting messages is the main feature of what makes Edmodo great. You have the ability for you and your students to post and respond to other posts easily and in real time. It is very easy to do and very helpful. Take a look at the Comment Box found at the top of your homepage. I'll take a look at the other tabs in future posts, but for now stay on the Note tab.

It is pretty easy to see what you need to do. Type your message in the larger blank box. Then where it says Send to... type in which group or person you want to send the message to. Right underneath that section are a series of buttons that let you attach files, hyperlinks, items from your library, and schedule the post. Once you're finished with your message click Send and you’re done!

What can you do with Edmodo?
Search the internet and you can find a ton of ideas for using Edmodo in your classroom. Here's a list of some things you can do.

  1. Post assignments, with or without attaching files.
  2. Have students post book reviews.
  3. Provide links to websites students need for further study.
  4. Give students a quiz to determine understanding.
  5. Have students collaborate on a writing assignment.
  6. Have students respond to writing prompts.
  7. Post a video and have students respond or critique it.
  8. Connect with other classrooms during the Global Read Aloud.
  9. Role Playing: Help students understand key historical and literacy events by reenacting them through role playing activities in Edmodo.
  10. Peer Reviews & Critiques: Place students in small groups and have them post their work to their group for peer review and feedback.
  11. Writing Projects: Enable students to tap into individualism and build self-esteem by sharing their writing projects with each other in Edmodo.
  12. Build Digital Citizenship Skills: Enforce online etiquette guidelines for students when using Edmodo to help them build digital citizenship skills.
  13. Book Reviews: Encourage students to read and discuss novels with each other.
  14. Cultural Exchange Projects: Give students the opportunity to learn about other world cultures by connecting your classroom with classrooms around the globe via an Edmodo group.
  15.  Sub-Hub: Use Edmodo to communicate with your students when you’re out of the classroom, or provide updates to students who are absent from class.
  16.  Science Probes: Promote discussions and bring more interaction to your science class by engaging your students with science probes.
  17. Current Events: Help students stay up to date on the latest news by posting current events or having students contribute news they discover.
                  Are you ready to get started with Edmodo? Download the Edmodo Technology Integration Challenge and see what you can do!
                  Read More »